We're calling this Lobster Bisque "Farmhouse" not because we are farming lobsters, but because this bisque includes ingredients that are always on hand at our farmhouse. The soup includes bacon, which we cured and smoked here at our farmhouse. The bacon is from the Red Waddle pigs we pasture raised behind the farmhouse. The vegetables and herbs are from the garden, and many of the ingredients, like the roasted garlic and fresh tomato juice, are really great ingredients that I prepped this fall for dishes like this one. "Farmhouse" might signify; a little rough around the edges. It could translate as; wholesome and home grown. Right now, a few words that come to mind when I think of farmhouse: snow, wind-chill, and rosy cheeks. This bisque was a necessity to combat the elements.
Because this bisque has the word "Farmhouse" in front of it, it is less intimidating to make. I used what I had on hand, Jameson instead of brandy for instance. I used a sparing amount of fresh rosemary to add that hint of pine, which surround the farmhouse and whose branches are heavily burdened with snow. A bit of fresh lemon zest adds a pick-me-up and freshens up those hearty, woodsy, farmhouse-y flavors. It's a favorite for the Holidays! Merry Christmas and Happy Farmhouse Lobster Bisque!!
FARMHOUSE LOBSTER BISQUE
1/2 cup bacon, diced
In a heavy bottomed stock pot, brown the bacon. Remove the bacon from the pan and set aside (the bacon will be used later as a sort of 'bacon crouton' to garnish the soup). In the remaining bacon fat sauté over medium heat:
1 leek, sliced
1 carrot, chopped
2 TBLS roasted garlic cloves
1 lobster tail shell, meat removed, and set aside (Yes, just the shell!)
When all of the above ingredients have just started to brown, add:
1 shot of Jameson
4 cups water
1 cup fresh tomato juice
1/2 tsp fresh rosemary, minced
1/2 tsp thyme
1/4 tsp black pepper
1 bay leaf
a pinch of chili flakes
1 tsp lemon zest
Bring all of the ingredients to a boil, then lower the heat to a slow simmer. Allow to simmer until the liquids have reduced by half. Remove the shell, or leave it in (I leave it in and strain the stock several times), and blend in a blender until completely blended. Strain the lobster stock back into the stock pot. Add :
salt to taste
1 cup heavy cream
Bring the bisque to a low simmer, tasting and adjust the seasonings as needed. Thicken the soup with a roux. I used about 3 TBLS butter and 3 TBLS flour for my roux, sautéed together until a very light golden brown starts to happen. Whisk the roux into the soup, and allow the soup the simmer on low heat for another 10 minutes. When the bisque has thickened, taste and adjust seasonings. At this point I added a squeeze of fresh lemon juice and a touch more salt. If the soup seems a bit on the thick side, add a splash more cream. At this very last second of the bisque being hot and lowly simmering, I add the lobster meat, which I've diced. It only needs but a moment to simmer in the bisque. After about 30 seconds, it is done. No joke- don't simmer that lobster for any longer!
Ladle the soup into bowls, and garnish with the crisped bacon. I happened to have scallion pesto on hand, so a dollop of that garnished it as well. I like this soup with a chunk of crusty bread, on a cold winter's night, or on a lazy Sunday afternoon when I have time to dabble in the kitchen. Enjoy! Belly up!!
Tuesday, December 24, 2013
Monday, December 9, 2013
Wheat free Buttermilk Biscuits with Leaf Lard
There is a great cookbook out there by Kim Boyce called, 'Good to the Grain'. The book features alternative flours with recipes to go along, so you can test each of the different flours in something wonderful you've baked in your kitchen. There are cookies, waffles, scones, muffins and many more treats to test out in your kitchen. The book is a great reference guide to the flavor profiles of each of the individual flours, and what to pair those flours with. It's wonderful! I have been using the book often while experimenting with wheat free cooking. The cookbook is not gluten free baking, so if that is what you're looking for, this book is not that at all. The book explores the varieties of flours that are out there, sometimes the history and nutritional value of each, and flavor pairings. Again, it is wonderful!! There is a multigrain flour recipe included in 'Good to the Grain'. I love it! I have made alterations to the original and it is included below. The more flours I taste, the more I want to include them in the mix. It's a good problem to have.
As with the Cranberry relish recipe, I promised to share a wheat free biscuit recipe using Leaf lard. I'm really doing it! I made these biscuits with the Leaf lard rendered from our pastured pigs. It is GREAT! I also added in some bonus bacon bits and butter toasted pecans for good measure. I wouldn't steer you wrong! These biscuits will blow the minds of your Holiday guests this season. Go biscuit power!!
2 cups multigrain flour mix*
1/4 tsp baking soda
1 TBLS baking powder
1 tsp salt
3 TBLS unsalted butter, cubed
3 TBLS Leaf lard
1 cup buttermilk
1/4 cup chopped, cooked bacon
1/4 cup butter toasted pecans, chopped*
* Multigrain flour mix: 1 cup spelt flour, 1 cup oat flour, 1 cup barley flour, 1/2 cup rye flour, 1/2 cup almond flour. Combine all of the flours together in a large bowl, mix thoroughly, and substitute in your favorite baking recipes!
* To butter toast the pecans, simply add 1 TBLS salted butter to a skillet over medium heat. When the butter is melted, add the pecans and stir until the pecans smell toasty and nutty. Season to taste with salt and pepper. Cool and chop.
In a large bowl combine the dry ingredients. Work in the butter, until the cubes turn into pea sized bits. Now work in the lard. The lard sort of melts into the dough quickly, so it doesn't require much working in. Mix in the pecans and bacon. Make a well in the center of the dry ingredients and pour in the buttermilk. Stir together until just combined. Turn the dough out onto a floured surface, and pat into a 1 1/2 inch thick disk. Using a biscuit cutter, cut out biscuits, and place them on a parchment lined baking sheet. With the remaining scraps of dough, gently press them together and cut out a few more biscuits. Brush the tops with buttermilk and sprinkle with smoked sea salt if desired. Bake at 400 degrees for about 8-12 minutes, or until the bottoms are golden brown. For best results, serve warm! Belly up!!
Mom's Cranberry Relish
The Holiday season is in full force. It makes me want to hang Christmas lights everywhere, go sledding, and eat a lot of sugar in any form. I love it, and I have done all three of those activities a whole bunch!! Hurray for so much snow, you don't even know what to do- except go sledding! Right now though, I am contemplating if I may have overdosed on the 'consumption of sugar' part of the Holiday spirit I am rolling with. It happens to everyone, right? You start baking cookies like nobodies business (for your friends of coarse), and the next thing you know you've got nothing left to show for it but a platter full of crumbs. Every time! Geez!
There is one solution. My Mom's cranberry relish recipe. It's a cure all. It's a whole lot of raw fruits chopped together to make an amazingly healthy and delicious relish. We pretend that if you eat it after over consuming cookies, it will even it all out. Mentally. Maybe. I meant to post the recipe before Thanksgiving, but I was too busy living life. So here it is now. It is a great relish for Christmas dinner too!
Mom's Cranberry Relish
1 16 oz pkg fresh cranberries
2 cups fresh pineapple, peeled and chopped
2 medium sized, crisp- fleshed apples, roughly chopped (Honey crisp works great)
1 medium sized orange, zested, peeled and roughly chopped
1/2 cup sugar or 1/3 cup honey, optional
1/2 tsp orange oil, optional
Soak the cranberries in a large bowl or kitchen sink with a dash of vinegar for about 10 minutes, picking out any bad cranberries. Also wash the apples and orange.
Using a food processor chop, in batches, the cranberries, pineapple, apples, and orange. Place the chopped ingredients in a large bowl. Add the sugar or honey to your desired sweetness. Mix thoroughly. Add the orange zest and the orange extract if using. Refrigerate until use. The relish is best made a few days ahead of time and refrigerated to let all of the juices and flavors mingle and get happy together. You can fold this relish into quick bread or muffins, eat it atop a ham sandwich with mayo and arugula, or straight up to mentally balance all of the cookies you've consumed. Belly up!!
Tuesday, November 26, 2013
Going Hog Wild
My husband and I slaughtered and butchered a whole hog this weekend. Little did I know, the work involved in the 'pasture to pork chop' process . I am humbled. There is skill in both slaughtering and butchering, and I now know that I only wish to master the art of butchering.

In the beginning, I always new that I wanted to raise my own food. A garden soon led to our egg laying hens, which led to some young feeder pigs from a friend's homestead. They were cute. There is no denying that we practiced extremely, extraordinary animal husbandry. When our pigs leaned in for a rump scratch, we obliged them. When the temperatures dropped, we made them a deluxe straw-bale bed. We fed them organic produce scraps from the Co-op and chased them around the pasture. It was over the top, but our pigs grew up into beautiful specimens. I have discovered that beautiful specimens taste delicious. It was worth doing 'pig' chores in the rain, the fog, and now the bitter cold. I feel tremendous joy that we did this. We did it! From pasture to pork chop, there were many lessons learned and many skills gained.
I was introduced to 'The anatomy of Thrift', a you tube series based on the art of butchery. You can watch the series on side butchery, which I shared on my last post. The videos were a life saver, and we need to hug all of the folks involved in putting together that very helpful tutorial on butchery. There are no butcher shops in Grand Marais. You are on your own when it comes to processing your animals, so inevitably we have become self- sustaining homesteaders. I just high- fived myself!
To carry on with homesteading traditions, I rendered my own lard; being careful to render the fat back separate from the treasured leaf lard. The leaf lard is the fat found along the inside of the loin and surrounds the organs. It is the highest grade of fat because it has the least amount of 'porky' flavor. It is ideal for pastries, so you pastry chef pals will be getting a jar! After rendering I was left with pork cracklings, which we overdosed on immediately. They are like pork croutons! So great on salads or to float in a bowl of creamy tomato soup. I'll share a wheat-free buttermilk biscuit recipe using a lard and butter blend in the future.

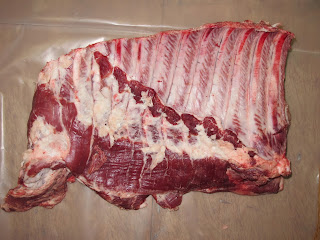
The bacon is being cured thanks to an article from 'The Splendid Table', which you can check out at splendidtable.org/recipes/curing-your-own-bacon. I was nervous about handling my own bacon, but this recipe talks you through it. After reading you will probably be tempted to go out and buy your own side of pork belly, and cure your own bacon. Rock on! In the recipe, the cure is easy and there are smoking variations using your patio grill and/ or your oven. Salt, sugar, and smoke. I got this! The hams will have a soak in a brine and then have a smoke and roast later. Hooray for salty, smokey pork!

All in all, it was a successful weekend. Successful that we are harvesting healthy, home-grown food. Successful that we can be self- sustaining. And successful that we are teaching and preserving this old school way of living to future generations. My daughter was fascinated by the different cuts of pork laid out on our dinning room table. She wanted to know where each of the cuts came from. She was literally tickled when I showed her where pork belly is found. I think she will be a future bacon enthusiast. In the end we lived more and learned more. We are thankful to everyone! Thanks you family! Thank you friends! Thank you pigs!


In the beginning, I always new that I wanted to raise my own food. A garden soon led to our egg laying hens, which led to some young feeder pigs from a friend's homestead. They were cute. There is no denying that we practiced extremely, extraordinary animal husbandry. When our pigs leaned in for a rump scratch, we obliged them. When the temperatures dropped, we made them a deluxe straw-bale bed. We fed them organic produce scraps from the Co-op and chased them around the pasture. It was over the top, but our pigs grew up into beautiful specimens. I have discovered that beautiful specimens taste delicious. It was worth doing 'pig' chores in the rain, the fog, and now the bitter cold. I feel tremendous joy that we did this. We did it! From pasture to pork chop, there were many lessons learned and many skills gained.
I was introduced to 'The anatomy of Thrift', a you tube series based on the art of butchery. You can watch the series on side butchery, which I shared on my last post. The videos were a life saver, and we need to hug all of the folks involved in putting together that very helpful tutorial on butchery. There are no butcher shops in Grand Marais. You are on your own when it comes to processing your animals, so inevitably we have become self- sustaining homesteaders. I just high- fived myself!
To carry on with homesteading traditions, I rendered my own lard; being careful to render the fat back separate from the treasured leaf lard. The leaf lard is the fat found along the inside of the loin and surrounds the organs. It is the highest grade of fat because it has the least amount of 'porky' flavor. It is ideal for pastries, so you pastry chef pals will be getting a jar! After rendering I was left with pork cracklings, which we overdosed on immediately. They are like pork croutons! So great on salads or to float in a bowl of creamy tomato soup. I'll share a wheat-free buttermilk biscuit recipe using a lard and butter blend in the future.

the rendered lard with pre-broken down loins
The bacon is being cured thanks to an article from 'The Splendid Table', which you can check out at splendidtable.org/recipes/curing-your-own-bacon. I was nervous about handling my own bacon, but this recipe talks you through it. After reading you will probably be tempted to go out and buy your own side of pork belly, and cure your own bacon. Rock on! In the recipe, the cure is easy and there are smoking variations using your patio grill and/ or your oven. Salt, sugar, and smoke. I got this! The hams will have a soak in a brine and then have a smoke and roast later. Hooray for salty, smokey pork!

the pork belly before I removed the spare ribs

doesn't everyone stick recipes on the cupboard doors?
All in all, it was a successful weekend. Successful that we are harvesting healthy, home-grown food. Successful that we can be self- sustaining. And successful that we are teaching and preserving this old school way of living to future generations. My daughter was fascinated by the different cuts of pork laid out on our dinning room table. She wanted to know where each of the cuts came from. She was literally tickled when I showed her where pork belly is found. I think she will be a future bacon enthusiast. In the end we lived more and learned more. We are thankful to everyone! Thanks you family! Thank you friends! Thank you pigs!

Sunday, November 24, 2013
Sunday, November 10, 2013
Venison & Butternut Squash Chili
Outside it is drizzling, sometimes sleeting, and sometimes sunny- with a slight wind off of the lake. It's the typical deer hunting conditions of Northern Minnesota, which is happening right now. This weekend kicks off the start of the season, and as I went into Buck's hardware to pick up my kitchen knives, which were being sharpened, and a gallon of pink paint for my daughter's bedroom, there was a line up at the scale outside. Blaze orange and mud. Those are the colors that decorate the hunters weighing in their game of the day. I am not much of a hunter. I am keeping the fire going and making venison chili. I might also be online shopping for the perfect pair jeans, while I paint my daughter's bedroom pink- with my trusty Labrador under foot, anticipating a venison handout which is not going to happen. It's exhausting work, really.
I grew up hunting with my Dad, my Aunt Rene (Who can handle a gun like Annie Oakley, and shoots a buck on opener day almost every year), and Uncles. We would wake up early, before the sunrise, and guzzle hot chocolate and munch on snacks that my mom would pack for us, our eyes still closed. We would walk as quietly and gracefully as an uncoordinated youngster can, while wearing too many layers of clothes, boots that were a few sizes too big, and carrying a gun. We were obnoxious juveniles, but my Dad was always fairly patient. I don't really think he was worried about harvesting a deer, but wanted to give us the opportunity instead. When we became way too fidgety from the cold settling in down our necks and through our insulated coveralls, we would head back to the house. My Mom always had chili at the ready. Thank goodness Mom!! Seriously, I wasn't that into deer hunting, but it gave us a chance to be out in the wild, learning skills that I never thought would be beneficial to my future. We were on the prowl, like young savages. I'm sure it also gave my Mom a much needed break from her always louder than life kids. It was a good time had by all.
This afternoon, as I reminisce of the past and spend far too much time taking pictures of food, I feel bliss. I may not be able to compete with my Aunt, whom shoots a muzzle loader and I have witnessed skinning a squirrel in record time. I am not out hunting deer right now. But I did spend most of my time as a kid running around in the forests and pastures of Wisconsin, and I am gifting that experience to my daughter. I do spend a remarkable time outdoors, comfortable in that environment. Yeah, I sometimes find myself trying desperately to decide if skinny jeans are right for me.... but I feel bliss that I have balanced all of it out. The outdoors, the indoors, the skinny jeans, and the flavors of my chili. Slightly game-y venison paired with sweet and earthly butternut squash- grown in my sister-in-law's straw bale garden. Just the right amount of chilies, cumin, and cinnamon make it just how I want it. The porter helps add the dark and roast-y flavors, as well as the poblano peppers and the fire roasted tomatoes. Getting a really good sear on the venison really makes the magic happen. I hope you enjoy!!!
Venison & Butternut Squash Chili
3 pounds venison, trimmed and cubed
1 medium onion, small diced
1 heaping Tbls roasted garlic (about 5 cloves), chopped
1 medium poblano pepper, chopped
2 Tbl chili powder
2 tsp cumin
1/2 tsp cinnamon
1 bottle of porter (I used Summit Great Northern Porter)
1 can fire roasted diced tomatoes
1 can fire roasted crushed tomatoes
4 cups butternut squash, large dice
2 cans black beans, drained
salt and black pepper to taste
Sear the venison in batches in a large- heavy bottomed pot or a cast iron griddle, using olive oil of bacon fat. Set the venison aside. In the same pot add the onion and saute until translucent, about 5 minutes. Add the garlic and the poblano pepper and saute a few minutes more. Add the venison back to the pot with the chili powder, cumin, and the cinnamon. Saute everything, stirring often, to brown up the spices. Add the porter, scraping up the bits from the bottom of the pan, and reduce the heat to low. Add the tomatoes, taste and season well with salt and black pepper. Allow to simmer on low heat for about 30 minutes, or until the meat is almost tender. Add the butternut squash, and more beer if the chili seems a bit dry. Continue to simmer on low for about 20 more minutes until the squash and the venison are tender. If you add the squash too soon, it may break down into oblivion before the venison becomes tender. If that happens, it will still taste really great!! Adjust the seasonings to your liking. When the chili is complete, turn off the heat and add the beans. Don't worry, the residual heat will warm the beans. Ladle into bowls, and top with any or all of the following; sour cream, fresh cilantro, diced avocado, and my Mom's favorite- crushed Frito corn chips. Belly up!!
I grew up hunting with my Dad, my Aunt Rene (Who can handle a gun like Annie Oakley, and shoots a buck on opener day almost every year), and Uncles. We would wake up early, before the sunrise, and guzzle hot chocolate and munch on snacks that my mom would pack for us, our eyes still closed. We would walk as quietly and gracefully as an uncoordinated youngster can, while wearing too many layers of clothes, boots that were a few sizes too big, and carrying a gun. We were obnoxious juveniles, but my Dad was always fairly patient. I don't really think he was worried about harvesting a deer, but wanted to give us the opportunity instead. When we became way too fidgety from the cold settling in down our necks and through our insulated coveralls, we would head back to the house. My Mom always had chili at the ready. Thank goodness Mom!! Seriously, I wasn't that into deer hunting, but it gave us a chance to be out in the wild, learning skills that I never thought would be beneficial to my future. We were on the prowl, like young savages. I'm sure it also gave my Mom a much needed break from her always louder than life kids. It was a good time had by all.
This afternoon, as I reminisce of the past and spend far too much time taking pictures of food, I feel bliss. I may not be able to compete with my Aunt, whom shoots a muzzle loader and I have witnessed skinning a squirrel in record time. I am not out hunting deer right now. But I did spend most of my time as a kid running around in the forests and pastures of Wisconsin, and I am gifting that experience to my daughter. I do spend a remarkable time outdoors, comfortable in that environment. Yeah, I sometimes find myself trying desperately to decide if skinny jeans are right for me.... but I feel bliss that I have balanced all of it out. The outdoors, the indoors, the skinny jeans, and the flavors of my chili. Slightly game-y venison paired with sweet and earthly butternut squash- grown in my sister-in-law's straw bale garden. Just the right amount of chilies, cumin, and cinnamon make it just how I want it. The porter helps add the dark and roast-y flavors, as well as the poblano peppers and the fire roasted tomatoes. Getting a really good sear on the venison really makes the magic happen. I hope you enjoy!!!
 |
| These were the two essentials to adding dept of flavor to the venison chili! |
Venison & Butternut Squash Chili
3 pounds venison, trimmed and cubed
1 medium onion, small diced
1 heaping Tbls roasted garlic (about 5 cloves), chopped
1 medium poblano pepper, chopped
2 Tbl chili powder
2 tsp cumin
1/2 tsp cinnamon
1 bottle of porter (I used Summit Great Northern Porter)
1 can fire roasted diced tomatoes
1 can fire roasted crushed tomatoes
4 cups butternut squash, large dice
2 cans black beans, drained
salt and black pepper to taste
Sear the venison in batches in a large- heavy bottomed pot or a cast iron griddle, using olive oil of bacon fat. Set the venison aside. In the same pot add the onion and saute until translucent, about 5 minutes. Add the garlic and the poblano pepper and saute a few minutes more. Add the venison back to the pot with the chili powder, cumin, and the cinnamon. Saute everything, stirring often, to brown up the spices. Add the porter, scraping up the bits from the bottom of the pan, and reduce the heat to low. Add the tomatoes, taste and season well with salt and black pepper. Allow to simmer on low heat for about 30 minutes, or until the meat is almost tender. Add the butternut squash, and more beer if the chili seems a bit dry. Continue to simmer on low for about 20 more minutes until the squash and the venison are tender. If you add the squash too soon, it may break down into oblivion before the venison becomes tender. If that happens, it will still taste really great!! Adjust the seasonings to your liking. When the chili is complete, turn off the heat and add the beans. Don't worry, the residual heat will warm the beans. Ladle into bowls, and top with any or all of the following; sour cream, fresh cilantro, diced avocado, and my Mom's favorite- crushed Frito corn chips. Belly up!!
 |
| the cubed venison |
 |
| Getting a good sear is important. I am using this awesome stove top cast iron griddle that my Mom no longer had use for. It is awesome! It's like having my own flat top in my kitchen! |
 |
| The large diced butternut squash. Roasting the squash in a 400 degree oven until it is tender and toasty would be a fine way to handle the squash, instead of cooking it in the chili. Add it to the chili at the end of cooking, with the beans. Just another way to incorporate a roasted flavor element to your chili! |
Monday, October 28, 2013
Mary's Green Tomato & Pork Pozole
Meet John and Mary Ofjord. They are our kind neighbors. We like to honor the barter system with our neighbors. Our latest barter: Jeremy and I helped unload and stack over 200 bales of hay. In return, I get Mary's Green Tomato Pozole recipe. They are really good at bartering. I am terrible, but I do have this new recipe to put all of my green tomatoes to good use. Plus we get to spend time with our unique and gifted neighbors who have the most amazing Norwegian Fjord horses.
Aren't the beautiful? And they live right across the road! My daughter loves to watch the sun rise over their pasture while she battles it out with buttery toast at the breakfast table. It's a very unique view! And it's not that my daughter hates buttery toast, it's just that she strongly dislikes moving in any sort of progressive motion before the bus arrives at the end of our driveway each morning. The view helps the struggle.
 |
| The Fjord horses frolicking through the snow. |
\So about that recipe? I made it the very next day of the hay bale marathon. Pozole is an irresistible pork and hominy stew. It has the same comforting affect as a homey bowl of chicken noodle soup, but with spices to warm you. I love it for it's simplicity. I am wowed by it's flavors. The green tomatoes add a tartness and acidity that balances the richness of the pork. Garnish with fresh cilantro, scallions, and lime wedges for a super bowl of goodness to enjoy in front of the fire place!
Mary's Green Tomato & Pork Pozole
4 cups green tomatoes, diced
2 lbs boneless pork shoulder cut into 1 inch cubes
1 medium onion, chopped
Olive Oil for the pan
1 tsp dried oregano
1 tsp cumin ( I doubled the amount. Sorry Mary!)
3 cloves garlic, minced
2 fresh jalapenos, seeded and minced
2- 15 ounce cans white hominy, drained and rinsed
2- 14 ounce cans chicken stock, or the equivalent in homemade stock
juice of 1 lime, plus lime wedges for garnish
fresh cilantro, chopped for garnish
salt to taste
Garnishes:
Grated radish
Grated Pepper jack cheese
Sour Cream or Yogurt
Minced Onion or Scallions
Lime wedges
Cilantro
Mary says: With a lot of green tomatoes left over at the end of the season, I was trying to find new ways to use them up. Fried green tomatoes are not my thing and you can only use so much green tomato relish around the house. Since I've had a difficult time growing enough tomatillos (the traditional ingredient for Pozole) to make Pozole, a green pork stew which I dearly love, I tried making it with the green tomatoes instead. Some green tomatoes are not quite as acidic tasting as the tomatillos, so you will need to add lime juice to balance the tartness, but taste the stew first as some tomatoes are more tart than others.
To make Mary's Pozole:
Heat the olive oil in a Dutch oven or heavy bottomed pan. Brown the cubes of pork in batches. The better the pork is browned, the richer the taste of the finished stew. Set the browned meat aside.
Next add the onions and garlic to the pan and saute until the onions are translucent. Be sure not to scorch the garlic. Add the tomatoes, oregano, cumin, jalapenos, stock, and the browned meat. You can mash up the tomatoes, if necessary. Bring the stew to a boil, then cover and turn down the heat to a low simmer until the meat is tender- about 45 minutes to an hour. If your tomatoes are still in large pieces, take them out with a slotted spoon and process them in the food processor.
Once the meat is tender, add the two cans of hominy, the cilantro and the lime juice. You may want to taste the stew before adding the lime juice if your tomatoes were tart. Add salt (I added about a teaspoon), and heat to serve, topping with desired garnishes. Serves about 4-6 depending on who you have over for dinner!
Belly Up!!
Tuesday, October 15, 2013
Caramel Apples
I don't know if anyone has noticed, but we are up to our ears in apples at the Co-op. The Co-op currently has 16 different varieties of apples, 9 of them being regional. Woah Nelly, that's a lot of apples! I used to find this much variety a bit overwhelming. I now find it fascinating and progressive. Progressive because not only are new, delicious varieties of apples being created, but older, heritage varieties are being reintroduced, recognized, and preserved as well. It shows that we can create great apples, but also cherish those varieties that have been lost or under appreciated in the past. I get weak in the knees over a great apple. Everyone seems to have their own preference of what a good apple contains. For me, I like crisp and sweet. Unless I'm baking a pie, then I like crisp and tart. It's all about crisp apples for me. Although Cortland apples have a wonderful tart flavor that I love, but the apple is soft. What is a girl to do?!
So let's talk apple varieties for a second. Our regional apple selection at the Co-op is GREAT! We have Jonathon, Sommerfeld, Sweet 16, Cortland, Goodland, Chestnut Crab, Gala, Wolf River, and a Honeycrisp that is perfect. Flavor profiles you ask? Here's the low down; Sweet 16 is sweet and soft. The Cortland apples are tart and soft. The Chestnut Crab apples are tart and crisp. The Honeycrisp is sweet, but slightly tart with lots of juice and a crisp texture. (If you want to try a variety, but are a little nervous- go for the Honeycrisp!). The Wolf River apple is a very old variety that is large in size, commonly weighing over a pound. This apple is golden green to bright red in color with a firm cream- colored flesh that provides a rich, sweet flavor. The flesh is excellent for sauces, drying, baking, and just eating straight up. This apple has many characteristics of the apples that are on our farm, leading me to believe that I need to post some apple recipes ASAP! But first, a few more varieties and profiles that we feature at the Co-op......
Golden Delicious- crisp and sweet, with flavor notes such as pear, melon, and honey
Gala- crisp and sweet, this one seems to be a favorite eating apple for kids
Granny Smith- crisp and tart, great for pie and crisp operations
Braeburn- sweet, slightly tart with crisp flesh
Honeycrisp- sweet balanced perfectly with slightly tart, juicy, and crisp flesh. Make caramel apples!
Fuji- sweet and soft, with a mellow fruity flavor
Jonagold- sweet, crisp, and has been used as a vehicle for gorgonzola as my breakfast yesterday.
Whew! Apples! We love 'em, they are highly nutritious, and they are found in almost everyone's home this time of year. Here's what I've been doing with my apples. Eating an apple next to a hunk of gorgonzola cheese is ridiculously good. It makes the best breakfast. Unless you are commuting. Maybe don't try that combo while driving. I've been making a sauté of bacon, apples, and roasting garlic- finishing the sauté with a splash of fresh apple juice and white wine and serving over pork chops or chicken with a hearty green like kale or rainbow chard. I've been tucking apples in scone and muffins at work, and even making a creamy apple and butternut squash soup. My favorite treat to make with apples is the caramel apple. It's easy, fast, and can be eaten anywhere- around a campfire, at the bus stop, while riding a bicycle.......endless possibilities.
Caramel Apples
9 apples, I recommend a crisp and slightly tart variety (Honeycrisp!)
1 1/2 cups sugar
1/2 cup maple syrup
1/2 cup heavy cream
First, insert a skewer into the top of each apple. This will act as a handle for the ease of dipping the apples in caramel. It also makes for a handy handle for your caramel apple when it is ready for eating.
Combine the sugar and maple syrup in a medium heavy-bottomed saucepan, and stir. Cover, and cook over medium-high heat until sugar melts. Uncover, and continue to cook, swirling occasionally, until mixture is dark golden, about 10 minutes. Slowly drizzle in the heavy cream. Remove from heat, and stir until smooth. Transfer caramel to a small bowl. Let stand a few minutes to let caramel thicken and cool slightly.
Dip apples, one at a time, into caramel to coat the apples about three quarters of the way up the apple. Let excess drip off, and scrape bottom of apples against the side of the bowl to get some of the excess off.
*If you wanted to take your caramel apples to the next level, this is where you do so. Dip the caramel dipped apples into things like chopped dark and white chocolate, toasted nuts or pumpkin seeds, a sprinkle of smoked sea salt, and/or my daughter's favorite- sprinkles.
Place the apples on a parchment lined baking sheet, and allow them to set. Belly Up!!
Thursday, September 19, 2013
no-bake zucchini bread cookies
I'm going to tell you a secret. I gave up eating wheat over a month ago. There, I said it. Don't judge yet. Back in the day, I worked in a wonderful Patisserie, and lived off of cake scraps and broken cookies. It was a beautiful life. I would sometimes eat day old croissants, warmed in the oven, and slathered in lemon curd or chocolate ganache for lunch. Everyday. That went on for many years. I have since moved on from Margo's wonderful Patisserie, but my diet pretty much stayed the same. Yeah, i would eat a salad with my double chocolate zucchini muffin to try to offset the sugar rush. That only led to the eating of left over cake frosting later in the day. I have been on a wheat and sugar rush for the last ten years. Top that off with my naturally high energy and my excessive coffee drinking, and boy was I a mess. I was fast paced, and getting a lot done, but it wasn't pretty.
So I decided enough was enough. Since our bodies process wheat into sugar, I was eating sugar slathered in sugar. Awesome. My body was angry. My body was even more angry when I took all of the wheat away. I cried a lot. I ate chips of every variety instead of wheat. Potato chips. Tortilla chips. Chocolate chips. I still managed to loose about 8 pounds in the first few weeks. I think it was because I didn't know what to eat. No more bread? No more cookies? No more cake? What the heck is there to eat?! I have since gotten a grip. I feel better. I have energy, and not because I guzzled a double latte and shoveled in some broken chocolate chip cookies. No, it's like real energy. Fueled by goodness. It's weird. I still drink double lattes ( I feel like this is true confessions......I also eat a lot of ice cream, I don't floss everyday, and I think my husband is cute). I eat a lot of other grains like barley, quinoa, and oats. I also eat a lot of veggies and meat. And let's not forget cheese! I am starting to appreciate the challenges of cooking without wheat, and realize that there are a lot of creative ways to make good food happen without it. All in all. it's been a learning experience and I will probably reintroduce wheat into my diet again. But I know now that coconut and oat flours are the bomb!
It is the zucchini time of year. There should be a recognized holiday. Oh wait, there is. It's 'Sneak some zucchini onto your neighbor's porch' day. It's a real thing. It happened Aug 8th. In northern Minnesota, it needs to happen a little later, as our growing season is a bit behind. Anyway, zucchinis start showing up, and the decent thing to do is make zucchini bread. Everyone's grams did it. I used to do it. But not this year. I'm going to make everything but zucchini bread. However, these no-bake zucchini bread cookies are a great replacement. They taste of zucchini bread. They're dense, sweet, and moist like zucchini bread. I like them, and my wheat eating family thinks they're pretty tasty too!
No-Bake Zucchini Bread Cookies
1 1/2 cups oats
1/3 cup pistachios, chopped (walnuts, pecans, or almonds would work well too)
3/4 cup almond butter, I prefer the toasted no-salt variety
1/2 cup-1 cup chocolate chips
2 Tbl honey
3/4 tsp cinnamon
3/4 packed cup grated zucchini
pinch of salt
In a large bowl mix the oats and nuts. Stir in the honey, almond butter, and cinnamon. Grate the zucchini, place grated zucchini on a paper towel, roll paper towel up like a burrito, and squeeze any excess liquid out. Mix the zucchini in with the other ingredients. Form batter into teaspoon sized dollops and lightly roll between your palms to make ball shapes. Place the zucchini balls on a parchment lined baking sheet, place in the fridge, and allow to set for about an hour. Tuck into children's lunchboxes. Eat. Enjoy. Belly up!!
Monday, September 16, 2013
Eat, LOVE & celebrate homegrown goodness!
A sluff at blogging lately I may be, but I have had one spectacular month! I have been warmed by friends and family, celebrating LOVE with my husband, and cooking a lot of really good eats. I'll do my best to share as much as I can, without overwhelming you. Okay, I'm going to overwhelm you, but it's totally worth it! My husband and I threw a farm party to celebrate our union of love. This was the best farm party I have ever attended. We roasted/ smoked one of our heritage breed 'Red Wattle' pigs that we have been raising. We used apple wood from our apple trees for smoking. We made 12 pies. We sourced as much local fair as we could get our hands on. We had friends and family galore, who showered us in love and wonderful gifts. There were children climbing apple trees, a warming fire, PBR, and a bit of brain eating. It was a good time had by all, and it couldn't have been accomplished if it wasn't for our fantastic families, friends, and neighbors. My daughter also started kindergarten! Kindergarten! She also learned how to drive a tractor and grow tomatoes. Life is grand!
The roasting/ smoking of the pig was a very education and fulfilling experience. We have nurtured these beasts, and have given them the best food, water, and shelter that any pig could desire. When it came time to harvest the biggest of our mud wallowers for our farm feast, there were no tears or fears. It was simply harvesting pork. I feel slightly heartless not feeling any gentle tugging of my heartstrings, but we've been watching these pigs grow into wonderful cuts of meat for months. I see ham growing right before my eyes every day. Plus, it's not like a pig is a cuddly companion that will sit by your side, or fetch a stick. No, these pigs will do anything to get into that bucket of compost we bring out everyday. They will throw their mud-caked rumps in your direction, hoping to throw you off kilter, spilling bruised peaches and melon rinds in their direction. We love our pigs, and treat them kindly, knowing their lives are a sacrifice to fill the bellies of our family and friends. It is important to me to know where my food comes from, and how it was raised. I know the whole story with our pigs, and it's a good one. I know that nothing was wasted with our pig roast. We had a taste of every part of that pig, including the brains, which were surprisingly creamy with a slightly livery undertone. They would've been fantastic with some grilled bread, and maybe some homemade pickles.
By now you have probably gathered that I really dig growing my own food. I feel contentment and accomplishment going into our long winters with several cords of wood split and stacked, and a root cellar and freezer full of homemade goodies. Besides pork, we have a lot of things tucked away for the winter months. If you would've asked me 10 years ago if I'd be stock piling canned goods, I would've laughed at you while on my way to Trader Joe's. I now have more vested interest in food. I want to grow it, preserve it, and savor it all year long. Today I thought I'd share a few ways that I've preserved homegrown tomatoes that our families brought up to us by the armloads. I've been dealing in tomatoes all week, and have finally finished my last batch. Whew!
Juicing. Simply put, I juiced about 2 dozen ripe and ready tomatoes in my juicer. The juice is fresh and sweet, and will be wonderful in future bloody marys or will lend flavor to soups or stews. You can't beat the freshness and nutrition that fresh juice delivers. I packaged the juice in 1 cup increments, and froze them. This is my favorite tomato product I have on hand. If you've ever juiced before, you realize that you are stuck with a bunch of less juicy pulp of the fruit or veggie you are juicing. I used this, in my case it was tomatoes, to make creamy tomato basil soup. Score!
Next, I started roasting tomatoes. Roasting the tomatoes brings out their sweetness as well, and leaves you with a slightly concentrated, cooked down, chunky tomato sauce. I roasted my tomatoes in bacon fat and rosemary. You could go with olive oil and whatever herbs you have on hand. I like the smokiness that the bacon fat lends to the roasted tomatoes. I'll use these tomatoes to toss with pastas, or maybe as a base for soup. Are you nervous about my obsession with preserving the harvest yet? I am! But when I think about the quality of a tomato that I will have a tough time buying in the middle of winter in northern Minnesota, it all makes sense. The recipe; 5 pounds of ripe tomatoes, chunked and divided between two large roasting pans. Dollop with bacon fat- about 2 Tablespoons per pan. Throw in a sprig of rosemary per pan, and roast at 425 degrees until the tomatoes turn golden and the liquid in the pans start to cook down, about 20 minutes. Allow to cool completely and store in an airtight container in the freezer. This works well with cherry tomatoes too! Belly up!!
 |
| Addie's tractor stroll |
The roasting/ smoking of the pig was a very education and fulfilling experience. We have nurtured these beasts, and have given them the best food, water, and shelter that any pig could desire. When it came time to harvest the biggest of our mud wallowers for our farm feast, there were no tears or fears. It was simply harvesting pork. I feel slightly heartless not feeling any gentle tugging of my heartstrings, but we've been watching these pigs grow into wonderful cuts of meat for months. I see ham growing right before my eyes every day. Plus, it's not like a pig is a cuddly companion that will sit by your side, or fetch a stick. No, these pigs will do anything to get into that bucket of compost we bring out everyday. They will throw their mud-caked rumps in your direction, hoping to throw you off kilter, spilling bruised peaches and melon rinds in their direction. We love our pigs, and treat them kindly, knowing their lives are a sacrifice to fill the bellies of our family and friends. It is important to me to know where my food comes from, and how it was raised. I know the whole story with our pigs, and it's a good one. I know that nothing was wasted with our pig roast. We had a taste of every part of that pig, including the brains, which were surprisingly creamy with a slightly livery undertone. They would've been fantastic with some grilled bread, and maybe some homemade pickles.
 |
| Happy folks eating good eats! |
 |
| This is our nephew, Levi. He liked the farm party, and he's just cute! |
By now you have probably gathered that I really dig growing my own food. I feel contentment and accomplishment going into our long winters with several cords of wood split and stacked, and a root cellar and freezer full of homemade goodies. Besides pork, we have a lot of things tucked away for the winter months. If you would've asked me 10 years ago if I'd be stock piling canned goods, I would've laughed at you while on my way to Trader Joe's. I now have more vested interest in food. I want to grow it, preserve it, and savor it all year long. Today I thought I'd share a few ways that I've preserved homegrown tomatoes that our families brought up to us by the armloads. I've been dealing in tomatoes all week, and have finally finished my last batch. Whew!
Juicing. Simply put, I juiced about 2 dozen ripe and ready tomatoes in my juicer. The juice is fresh and sweet, and will be wonderful in future bloody marys or will lend flavor to soups or stews. You can't beat the freshness and nutrition that fresh juice delivers. I packaged the juice in 1 cup increments, and froze them. This is my favorite tomato product I have on hand. If you've ever juiced before, you realize that you are stuck with a bunch of less juicy pulp of the fruit or veggie you are juicing. I used this, in my case it was tomatoes, to make creamy tomato basil soup. Score!
Next, I started roasting tomatoes. Roasting the tomatoes brings out their sweetness as well, and leaves you with a slightly concentrated, cooked down, chunky tomato sauce. I roasted my tomatoes in bacon fat and rosemary. You could go with olive oil and whatever herbs you have on hand. I like the smokiness that the bacon fat lends to the roasted tomatoes. I'll use these tomatoes to toss with pastas, or maybe as a base for soup. Are you nervous about my obsession with preserving the harvest yet? I am! But when I think about the quality of a tomato that I will have a tough time buying in the middle of winter in northern Minnesota, it all makes sense. The recipe; 5 pounds of ripe tomatoes, chunked and divided between two large roasting pans. Dollop with bacon fat- about 2 Tablespoons per pan. Throw in a sprig of rosemary per pan, and roast at 425 degrees until the tomatoes turn golden and the liquid in the pans start to cook down, about 20 minutes. Allow to cool completely and store in an airtight container in the freezer. This works well with cherry tomatoes too! Belly up!!
 |
| tomatoes before roasting |
 |
| tomatoes after roasting |
 |
| and they lived happily ever after....with pigs and tomatoes..... |
Monday, August 5, 2013
Fresh Fig and Pistachio Crostata
Happy 101 blog day!! This is officially the 101st blog entry that I have written, and whew it has been fun! I have learned a lot by trial, error, and researching food as I blog. I'm a nerd. To celebrate I am going to buy a new pair of thick rimmed glasses with a matching pocket protector, AND bake with fresh figs! It's a good day.
I am always wanting to expand my knowledge of food. I can't get enough. I try to get out and do things like socialize or jump on trampolines (funny story), but I always just end up in deep thought about food. Yeah, I'm a real thriller at parties. Unless I'm doing the cooking. I've decided to cook all of the food for my wedding reception. The idea worries most people, but I'm really excited about the whole thing. Good food + good people = wonderfulness. I can't stop thinking about what to cook! Figs have been on my mind a lot. Tonight it's just me and some fresh figs, working it out into something delicious. Hopefully my husband will walk through the kitchen, lured by the aroma of fresh figs roasting in a tender pistachio filling, and we can drink wine while we wait impatiently perched at the oven door, for our tart to finish baking. Yeah, that's my dream date night. I warned you about my nerd power.
In thinking about parties, people, nerds, and figs I decided to make a crostata. Crostata is Italian for 'free formed pie', meaning no pie pan is needed. No, you're a free formed pie! I know that fresh figs baked in a pistachio filling, all tucked into a cornmeal crust will be divine. So I went to it. This recipe is easiest if attacked in steps. Step one; make the crust, roll it out, and chill it in the icebox. Yes, I said icebox. Step two, make the pistachio filling and slice the figs. Step three, assemble, bake, and wait impatiently at the oven door. If you turn the oven light on and off a few times, I'm convinced it makes the baking go quicker. Wine at step three is optional. This crostata is impressing the heck out of my house guest (and my husband, who did meet me at the oven door with wine), and it made it to the dessert list for reception time.
Fresh Fig and Pistachio Crostata
For the dough:
1 cup all purpose- flour
1/4 cup cornmeal
1 tsp sugar
1/2 tsp salt
3 Tbls buttermilk, or Greek yogurt
For the filling:
1/2 cup pistachios
1/2 cup sugar
1 large egg
4 Tbls butter
2 tsp all purpose- flour
1/2 vanilla bean, seeds scraped from the pod
1 pound fresh figs, stemmed and sliced
1 Tbl fresh lemon juice
1. Make the dough: In a food processor, pulse the flour, cornmeal, sugar, and salt to combine. Add the butter and pulse until the mixture resembles coarse meal, with a few pea shaped bits of butter remaining. Pour in the buttermilk, and pulse until the dough comes together. Do not over mix. On a large surface, place two sheets of plastic wrap side by side. Place the dough in the center. Cover with two more sheets of plastic wrap. Roll the dough into a circle, about 1/8 inch thick. Place the whole lot, plastic wrap and dough, in the icebox to chill and keep cool.
Make the filling: In the food processor, combine pistachios and sugar and process until finely ground. Add the egg, butter, flour, and vanilla bean and pulse until smooth. Set aside. In a separate bowl combine the sliced figs and the lemon juice.
Preheat the oven to 350 degrees. Place the rolled dough onto a parchment lined baking sheet, removing the plastic. Spread the pistachio filling over the dough, leaving a 2- inch border around the edges of the dough. Place the figs on top of the filling, and fold the dough border over the filling, pleating when necessary. Press down gently to seal.
Bake until the crust is golden brown, about 45 minutes. Allow to cool slightly before cutting. Serve warm or at room temp. Belly up!!!
 |
| try out the 'fish eye' setting on your camera. super fun! |
I am always wanting to expand my knowledge of food. I can't get enough. I try to get out and do things like socialize or jump on trampolines (funny story), but I always just end up in deep thought about food. Yeah, I'm a real thriller at parties. Unless I'm doing the cooking. I've decided to cook all of the food for my wedding reception. The idea worries most people, but I'm really excited about the whole thing. Good food + good people = wonderfulness. I can't stop thinking about what to cook! Figs have been on my mind a lot. Tonight it's just me and some fresh figs, working it out into something delicious. Hopefully my husband will walk through the kitchen, lured by the aroma of fresh figs roasting in a tender pistachio filling, and we can drink wine while we wait impatiently perched at the oven door, for our tart to finish baking. Yeah, that's my dream date night. I warned you about my nerd power.
 |
| power to the fig! |
In thinking about parties, people, nerds, and figs I decided to make a crostata. Crostata is Italian for 'free formed pie', meaning no pie pan is needed. No, you're a free formed pie! I know that fresh figs baked in a pistachio filling, all tucked into a cornmeal crust will be divine. So I went to it. This recipe is easiest if attacked in steps. Step one; make the crust, roll it out, and chill it in the icebox. Yes, I said icebox. Step two, make the pistachio filling and slice the figs. Step three, assemble, bake, and wait impatiently at the oven door. If you turn the oven light on and off a few times, I'm convinced it makes the baking go quicker. Wine at step three is optional. This crostata is impressing the heck out of my house guest (and my husband, who did meet me at the oven door with wine), and it made it to the dessert list for reception time.
 |
| roll out the dough. spread on the pistachio filling...... |
 | ||
top with sliced figs......
|

For the dough:
1 cup all purpose- flour
1/4 cup cornmeal
1 tsp sugar
1/2 tsp salt
3 Tbls buttermilk, or Greek yogurt
For the filling:
1/2 cup pistachios
1/2 cup sugar
1 large egg
4 Tbls butter
2 tsp all purpose- flour
1/2 vanilla bean, seeds scraped from the pod
1 pound fresh figs, stemmed and sliced
1 Tbl fresh lemon juice
1. Make the dough: In a food processor, pulse the flour, cornmeal, sugar, and salt to combine. Add the butter and pulse until the mixture resembles coarse meal, with a few pea shaped bits of butter remaining. Pour in the buttermilk, and pulse until the dough comes together. Do not over mix. On a large surface, place two sheets of plastic wrap side by side. Place the dough in the center. Cover with two more sheets of plastic wrap. Roll the dough into a circle, about 1/8 inch thick. Place the whole lot, plastic wrap and dough, in the icebox to chill and keep cool.
Make the filling: In the food processor, combine pistachios and sugar and process until finely ground. Add the egg, butter, flour, and vanilla bean and pulse until smooth. Set aside. In a separate bowl combine the sliced figs and the lemon juice.
Preheat the oven to 350 degrees. Place the rolled dough onto a parchment lined baking sheet, removing the plastic. Spread the pistachio filling over the dough, leaving a 2- inch border around the edges of the dough. Place the figs on top of the filling, and fold the dough border over the filling, pleating when necessary. Press down gently to seal.
Bake until the crust is golden brown, about 45 minutes. Allow to cool slightly before cutting. Serve warm or at room temp. Belly up!!!
 |
| the finished crostata. |
 |
| celebrated with a local brew! happy 101!! |
Monday, July 22, 2013
Mulberry Recipes
.jpeg) Returning back from a wonderful and productive trip to New Ulm, MN has left me re-fueled and ready. Ready you may ask? Yes, ready! Ready to tackle that landscaping project, the expand the pig pasture project, and maybe start the green house project. Mostly I'm ready to have another play date with my darling daughter and the sweetest niece and nephew a girl could ask for. Yes, New Ulm is full of wonderful things like a barber shop owner who gives killer hair cuts at a killer establishment called 'Rogers', mulberry trees that are starting to ripen, local beer and my brother's house full of beautiful children, baby kittens, and warm hospitality. Life is good. And as those mulberries start to ripen, it only gets better. Yeah, I can't stop thinking about those mulberries....
Returning back from a wonderful and productive trip to New Ulm, MN has left me re-fueled and ready. Ready you may ask? Yes, ready! Ready to tackle that landscaping project, the expand the pig pasture project, and maybe start the green house project. Mostly I'm ready to have another play date with my darling daughter and the sweetest niece and nephew a girl could ask for. Yes, New Ulm is full of wonderful things like a barber shop owner who gives killer hair cuts at a killer establishment called 'Rogers', mulberry trees that are starting to ripen, local beer and my brother's house full of beautiful children, baby kittens, and warm hospitality. Life is good. And as those mulberries start to ripen, it only gets better. Yeah, I can't stop thinking about those mulberries.....jpeg)
It was the girls who found them. My daughter is such a product of rural living, in a somewhat isolated village, where harvesting from the wild is common practice. I was a bit startled when the girls told me about eating not-so- delicious wild berries they found in the woods, but was relieved to find that they had just consumed unripe berries from an mulberry tree. Whew. What the heck is an mulberry tree is what my brother had to say about the ordeal. I am such a product of rural living as well, and after nerding out on plant and tree identification books, I quickly learned which plants and trees I could eat or eat from. That was really all I cared about- what can I eat out here in the wild? Can I start a fire with two sticks? No. Can I navigate by the stars? No. Can I whip you up something to eat, MacGyver style, in the wild? Probably.
Back to those mulberries. They look somewhat like a blackberry, and have a taste that is subtle and sweet. Mulberries are a good source of magnesium, potassium, iron, calcium, vitamin c, and fiber. One of mulberries greatest health asset is it's high concentration of resveratrol, an antioxidant currently being studied for it's effects on heart health. Rock on mulberries! They are delicious straight up, but I wanted to share a recipe or two, since they will soon be in great abundance for my brother and his beautiful wife. The first is a smoothie that we make a variation of almost every morning at our house, and is enjoyed by everyone. You can substitute any kind of berry for the mulberries, and alter the flavors with various juices.
Mulberry Smoothies
serves two
1 cup mulberries
1 banana
1 cup spinach or kale
1/2 cup juice (blackberry, blueberry, apple, orange...whatever you have usually works well)
1/2 cup vanilla soy milk
Combine above ingredients in a blender and you're good to go. The following is one of my favorite combos. I can never get enough. Simple. Good.
Mulberry & Chevre Salad
serves two
2 big handfuls of greens. I have a mix growing in the garden now. Young kale, spinach, mixed greens of any sort....
fresh goat cheese, crumbled ( as little or as much as you prefer)
fresh mulberries ( as few or as many as you can pack into your salad bowl)
toasted seeds or nuts. Think pistachios and flax, or almonds and poppy seeds.
fresh beet, peeled and grated
Toss the above with a simple dressing made with 2 Tbl maple syrup, 1 Tbl mustard and 2 Tbls olive oil. Season with sea salt and black pepper. I can't get enough. Belly up!!
Monday, July 8, 2013
Summer Drinks
The weather is warming up, and I am constantly reaching for something refreshing. As my Grandpa might say, "Something to wet my whistle". I was flipping through cook books and my piles of notes and recipe cards, and I came across a refreshing water I had made for a catering a few years ago. Cucumber-Lime water. It literally is water flavored with cucumber and lime, but it is so amazingly refreshing! Here's the ratio; 1 gallon filtered water, 1 small cucumber sliced, 1 lime sliced. Place the three ingredients in a pitcher, place in the fridge overnight, and the next day you have a cold, refreshing water with hints of cucumber and lime. Serve over ice, preferably on a picnic at the beach. It keeps for days, with the flavors intensifying the longer it sits.
Another drink recipe I have been meaning to share is a strawberry lemonade. Plus, Julie gave me a food challenge on our last radio segment, and this recipe fit the profile. Julie wanted a refreshing beverage with citrus or melon. You can't beat lemonade in the summertime! As always, you can substitute blueberries or blackberries or whatever berry is in season. Play around with the citrus too. Grapefruit or limes would pair well with the berries, so mix it up!
Strawberry Lemonade
for the simple syrup:
2 cups water
1 cup sugar
for the strawberry puree:
1 pint fresh strawberries
1 cup cold water
for the lemonade:
zest of 1 lemon
1 cup fresh squeezed lemon juice
1 cup cold water
ice
In a saucepan over high heat mix together the water and sugar. Cook until the sugar dissolves and it becomes a clear syrup. Remove from heat and set aside to cool while you complete the next steps.
Add the strawberries and the cold water together in a blender. Pulse until the mixture is pureed.
In a half gallon sized pitcher add the zest, lemon juice, cold water and ice. Stir in the simple syrup and the strawberry puree. Add more water if desired. Serve over ice.
I hope you are enjoying the summer!! Belly up!
Sunday, July 7, 2013
Newest Members of the Homestead
I thought I'd write a quick note and introduce the newest members of the homestead. I had no idea that these darling pigs would make us the hippest hangout on this side of County Road 14, but it has!! And that is awesome!! My daughter along with her cousin and the neighborhood kids have decided that farming is the greatest thing ever, er...well now that the pigs are still small and adorable. We have been having such a great time learning about the food we eat. Yes, these four guys and gals will be dinner some day, but we have the opportunity to give them a quality life with plenty of room to roam, plenty of good eats, and plenty of backside scratches! The brownish-red piggies are a breed called a 'Red Waddler', named after the 'waddlers' that dangle from their chins. The little pink fella is a Yorkshire/ Red Waddler mix, and is about 3 weeks younger than the three others. They are good looking pigs! I never thought I would ever be in possession of pigs, but my life is ever changing for the better! Here's to growing our own food!! Belly up!!


Monday, June 24, 2013
Cultured Honeydew Butter
Growing up in Wisconsin, there was an abundance of all things dairy, such as butter. My Grandmother and my Mother slathered butter on everything. I am a third generation butter slather-er. A slather consists of a generous amount of butter, no less than a tablespoon let's say. I will admit that I was a vegan once. For about five days. I couldn't live without cream in my coffee and butter slathers melting off of grilled sweet corn, warm bread, mashed potatoes, pancakes, and everything else that requires a slather of butter. You can imagine the conflict that went on in my head those five days. It wasn't pretty, but it helped me to find a more healthful balance of rations of butter and cream. My heart and general health can only handle butter in moderation. That said, I pick and choose those butter items carefully. When I came across this recipe from Heidi Swanson's website, QUITOKEETO, I knew I would have to plan accordingly. Cultured Honeydew Butter is one of the most floral, beautiful, and just darn right delicious things I have stumbled across in weeks!
The recipe is easy and old school which is something I cherish. In a world of so much factory made food, and so many food regulations, it is a nice change of pace. I could never make this recipe at work, as you are culturing the cream over night on a counter top, and that goes against all of the food safety training I've had to accomplish over the years. But at home, it's a different game. At home it's about simple pleasures; playing Frisbee in freshly mowed grass in bare feet, enjoying Sunday morning coffee outside while curled up in a quilt with my daughter, and of coarse slathering this butter. My Mother would be proud. My Grandmother would probably enjoy it too.
CULTURED HONEYDEW BUTTER
Combine 2 tablespoons of cultured buttermilk with 1 pint of the best heavy cream you can source. Leave out on a countertop for 12-24 hours. Then, if you have the time, chill the now-thickened cream. Use an electric mixer with the whisk attachment to beat well past whipped cream, until the buttermilk completely separates from the butter, ten minutes-ish. The butter should come together into a ball.
Reserve the buttermilk for another use, pressing as much of it out of the butter as possible. Rinse and press the butter with ice water until water runs clear of buttermilk. Fold one part honeydew into two parts fresh butter with a sprinkling of flaked sea salt.
Hope you enjoy!! Belly up!
Monday, June 10, 2013
Grilled Ramps & Smoked Salmon with Popped Capers & Quinoa
A lot has happened since I last blogged. I will report that the homemade chick feed was a hit, and the little rascals are growing right before our eyes. I whipped up that batch of chick feed just before I hit the road for my wonderful honeymoon adventure! By the way, I tied the knot at the end of May, so a honeymoon adventure was in order. We ate bison across South Dakota, and instead of hitting our final destination, Chico Hot Springs located in Paradise Valley just north of Yellowstone, we settled on wonderful hikes in and around the badlands and Custer State Park. We climbed the tallest summit in south Dakota, wandered old logging roads past beautiful ponds stocked with rainbow trout, and lingered in the prairie until the bison roamed through. South Dakota, who knew? It was spectacular. We drank rhubarb wine at the Prairie Berry winery in Hill City and then rode burrows after we panned for gold. Okay, we didn't ride burrows or pan for gold, but the rhubarb wine is 100% rhubarb-deliciousness.
Some time ago, before the wedding and the honeymoon, and before the chicks ran out of feed, Julie stumped me with a food challenge on our Tuesday radio chit chats. Make something with grains or legumes, and use citrus fruits or strawberries, Julie said. I got this, I said. Well, actually I became really busy, and then I hit the road, and so now I've got it.
This dish is more of a list of components that will really make your mouth happy when put together with a bit of love and served on a platter. Julie wanted me to use components that are more commonly found in the cupboards of local folks. I consider my cupboard pretty down to earth, so when I came across quinoa, maple syrup, and capers I knew I was onto something. It's the cooking process that turns the quinoa and capers into something fun and unusual. When you pan fry the two, they "pop", sorta like popcorn, but way more fun, and not as much height. The maple syrup lends sweet and earthy notes to a vinaigrette, and the grilled ramps are a nice spring addition, which pairs well with the smoked salmon and the capers.
Grilled Ramps & Smoked Salmon with Popped Capers & Quinoa
1) a handful of ramps, rinsed and drained
drizzle the ramps with olive oil, place on a preheated grill, and grill until grill marks appear and the young onion is slightly softened. season with salt and pepper and set aside to cool to room temp.
2) smoked salmon, I used about a half pound, skin and bones removed
3) the "popped" capers and quinoa.
in a saucepan of salted boiling water, cook 1/4 cup quinoa until just tender, 12 minutes. drain the quinoa through a fine mesh sieve and spread on a rimmed baking sheet to cool and dry completely. set a fine sieve over a heat-proof bowl. in a medium skillet, heat 1/4 inch of vegetable oil until simmering. add the quinoa and 2 tablespoons of well drained capers and fry over moderate heat, stirring, until the sizzling subsides and the quinoa is crisp and the capers have popped, 2 minutes. drain the quinoa and capers through the sieve and transfer to paper towels.
4) maple orange vinaigrette
whisk together 2 tablespoons maple syrup ( I use grade "B" for more maple flavor), 1/4 cup orange juice, 1 tablespoon dijon mustard, 1/2 cup olive oil, salt and pepper until emulsified. this makes a little extra for later use. you could spike this with 1 tablespoon bourbon if you want to 'wow' your father in-law.
5) assemble
by now you have completed steps 1-4, and you are ready for a spectacular show of ingredients. or you've just grown really impatient and are now eating an appetizer bowl of lucky charms. if the later is true, i apologize and i owe you a home brew.
for assembling this dish place an assortment of fresh spring greens on a platter. i used baby kale, arugula, spinach, and baby beet greens. top the greens with a few shaved radishes for crunch. layer on the grilled ramps and the smoked salmon. sprinkle the popped quinoa and capers on top. drizzle with as much or as little of the maple orange vinaigrette as you'd like. done. belly up!!
Friday, May 31, 2013
Chick Feed
I have done the unthinkable. I have allowed my daughter to be gifted baby chicks, and now I have four busy, fluffy chicks scampering around the homestead. They are adorable, at least they are now that they are no longer living in our house, as they temporarily were due to the wet and cold weather that has lingered just a bit too long this spring. They peck, scamper, and follow my daughter Addie around like, well, baby chicks. Above doing the unthinkable, I have done the craziest thing also. From the kitchen window, watching Addie and the chicks busy themselves outside, I made chick feed. I didn't intend to pamper these young hens as such, but it has become a necessity. There is no young chick feed to purchase in Grand Marais, and after glancing over the ingredient list of the last bag we purchased, I decided that we could do better, and for less. I browsed the internet for any crucial info regarding a young chicken's diet, and found that a trip through the bulk section at the Co-op would provide me with all of the ingredients those babies need. I'll admit that our chicks are eating high on the hog now, and if I had a bigger flock, I don't know that I would go to these lengths. I have now been dubbed an over achiever, and I'm okay with that. Happy hens lay good eggs!
It turns out that there are dozens of homemade chick feed recipes online, so that means other people are making their own chick feed, right? This is what I put together, and it's so far so good, as far as those chicks chowing down their new food goes. I should mention that we let them out in the evenings and on the weekends when we are home to keep a watchful eye on them. They get plenty of foraging time to eat grasses, peck dirt, and do what chickens do. We've also been feeding them bits of veggies and fruit that would otherwise be compost. Yes, my brothers are most likely laughing at me right now, but I swear our chicks are doing well with their new hippy diet!
Chick Feed
3 cups cracked corn
4 cups wheat berries
1 cup barley
1 cup buckwheat groats
1 cup millet
1 cup quinoa
1 cup split peas
1 cup lentils
1 cup sunflower seeds
1 cup peanuts
1/2 cup wheat bran
1/2 cup flax seeds
1/4 cup kelp granules
I processed this mix up a bit as those chicks can't handle big whole grains yet. It helped break everything up into a coarse mix, which the chicks can easily chow down. I never envisioned my culinary background put to use for chickens, but that is just one of the many new paths I get the opportunity to travel down and explore! Belly up!!
Tuesday, May 7, 2013
cockles and mussels alive, alive-o!
I am in love with a book I picked up at the library. It's called ' In the Kitchen with the Pike Place Fish Guys'. As I flipped through the pages, I knew I was going to be making seafood for dinner in my future. The book features recipes and tips from the crew of the Pike Place Fish Place. I should mention that I lived in Seattle for a bit. I spent most days going for long walks down to the Pike Place Market. I would buy produce at the many produce stands, listen to street musicians, buy seafood and wander back home, picking blackberries along the way. I spent a lot of time cooking really awesome food that was pretty much all harvested locally. I consumed a record amount of blackberries, halibut, and chowder and I have no regrets.
Living in Grand Marais is similar to living in Seattle. Swap our snow for rain, and it's pretty close. Living on Lake Superior gives us that damp atmosphere Seattle is famous for, and you can enjoy hot bowls of fresh chowder year round here as there. Plus there is a local fish monger who brings us a fresh catch everyday. I went to the Fish Market this past weekend because like I said, I was going to be making seafood for dinner in my future (and Dockside Fish Market has really awesome smoked salmon dip and I was getting hungry). The air in Grand Marais was a little heavy and thick, and had begun to smell of the sweet, sweet smells of Lake Superior. A little on the fishy side that morning, but it was wonderful to get a good waft of lake water air in my lungs. It further sealed that connection that I am having right now with Seattle, and further influenced my decision to buy more fish. My timing is impeccable, as the Fish Market has just opened up, and inside laid the bounty of my feast!
I settled on Mussels and fresh caught Lake Trout . I know, I know, what am I doing buying mussels when there's fresh caught fish from Lake Superior to be had? I have a thing for mussels. They are delicious, hard to come by in our secluded little harbor town, and my daughter has been singing the chorus to the Irish ballad of Molly Malone for weeks, so I need some cockles and mussels- alive, alive-o. I am sure that I will become a fish monger in my next life. I am perfectly content with the uniform, very truly love being out on the water, and I don't mind at all smelling of herring. So with my future in fish mongering mapped out, I set out to make mussels. The Lake Trout became Lake Trout BLT's, but that's another story.
Mussels are sweet and rich and they require very little to be delicious. I was thinking wine, leeks, garlic, parsley, and lemon. Pretty standard stuff. Keep it simple, and keep it fresh. My mussels were cleaned and came without beards. If your mussels have beards, grab the threads hanging out and pull toward the hinge of the mussel. With a sharp tug, the beard should come right off. Now get your game face on and make mussels!
Spring Mussels
1 1/2 pounds fresh, live mussels
1 small leek, cleaned and sliced
3 cloves garlic, minced or garlic scapes, sliced
1 1/2 cups white wine
2-4 Tbls butter (more or less to your desire)
1/4 cup fresh parsley, minced
1 lemon, zest and juice
sea salt, pinch
chili flakes, pinch
Place a saute pan large enough to to host 1 1/2 pounds of mussels, over high heat. Add about 2 Tbl olive oil.
When the pan is pre-heated, add the leeks and saute about 1 minute.
Add the garlic and the mussels to the pan and give it a few shakes. Add the wine and cover the pan, leaving it on high heat all the while.
After about 1 minute, lift the lid and take a peak at those mussels. They should have started to open. Place the lid back on the pan and saute another minute. Take another peak. If the mussels have all opened up, you are ready to add the remaining ingredients. If only a few mussels have opened, then you just need another minute or so of cooking time with the lid back on the pan.
When all of the mussels have opened, add the butter, parsley, lemon juice and lemon zest, sea salt and chili flakes. Give the mussels a stir, shake the pan, flip your ingredients into the air- back into the pan, and you are finished. Discard any mussels that did not open.
Place the mussels and the cooking liquid in a large serving bowl with a side of fresh crusty bread and the rest of that bottle of wine. Enjoy while the mussels are piping hot. Fantasize about the west coast. Belly up!!
Tuesday, April 30, 2013
Julie's Quinoa Bowl with Roasted Tofu, Summer Squash, & Egg
A few weeks ago Julie challenged me to create something edible from a small list of ingredients. She proposed tofu, squash, and something from the Easter basket. By now, all that's left in the dredges of the Easter basket is the Easter basket grass and a few fruity flavored tootsie rolls. Not much to work with there, so I went back to Easter morning and thought about what was in that basket that would work well in a dish. The dyed eggs of coarse!! I immediately labeled myself as the most brilliant person ever, and went to work throwing together ingredients until I came up with something edible.
Quinoa seems to be the popular grain right now. It's high in protein, fiber, and all things good so I've been working with it more and more. It is very versatile and has a nice nutty flavor. You could substitute brown rice or any grain that you've been harboring in your cupboard. It's all tossed together with an avocado dressing. I tried to incorporate spring flavors here, so use the most seasonal veggies you can find to keep it fresh and delicious!
Julie's Quinoa Bowl with Roasted Tofu, Summer Squash, & Easter Eggs
for the dressing:
1 large avocado, ripe
juice of 1 lemon
2 Tbls fresh chives, chopped
1 clove garlic
1/4 cup plain yogurt or buttermilk
1/2 cup water
sea salt and chili flakes to taste
Prepare the dressing by blending the avocado, lemon juice, chives, garlic, yogurt, water, salt, and chili flakes in a blender or food processor. Set aside.
For the other salad components:
3 large eggs
12 oz tofu, drained and diced
1 large zucchini or yellow squash, sliced
1/4 cup E.V.O.O.
sea salt
2 cups quinos, cooked and cooled to room temp
1/4 cup pine nuts
1/4 cup goat cheese, crumbled
chopped chives for garnish
Hard boil the three eggs. Place eggs in a pot, cover with cold water and bring to a boil. Turn off the heat, cover, and let set for about 5-8 minutes. Cool them in an ice bath or under cold running water. Set aside.
While the eggs are cooling start prepping the zucchini and tofu by tossing it with olive oil and salt in a medium bowl. Preheat your oven to 425 degrees. Place the tofu and zucchini on a large roasting pan or a couple of cookie sheets, drizzle with a touch more olive oil and roast in the oven until evenly browned, flipping and stirring half way through cooking time- about 15 minutes.
Crack and peel the cooled eggs, and cut each egg into quarters lengthwise.
Assemble the salad by tossing the quinoa with about 2/3 cup of the avocado dressing. Top with the roasted tofu and zucchini, pine nuts, eggs, goat cheese, and a bit of chopped chives for garnish. Serve this family style on a big platter with the left over dressing on the side. Belly up!!
Monday, April 15, 2013
North Carolina Grits
I was met with a three foot pile of snow piled and packed firmly around my car when I stepped off of the plane from Asheville, North Carolina this last weekend. I am determined to not get knocked down by the relentless weather. Instead, I'll focus on Asheville. The sunshine, the beautiful Blue Ridge Mountains, the barbeque, the hush puppies, and the grits. I never knew that I had such a crush on grits. They are delicious. I had them with cheddar. I had them with goat cheese. I had them with blue cheese. I had them with jalapenos and smoked cheddar. I was in love.
Asheville is a progressive city with a heavy hand in the local food movement. As my friend from Asheville explained, if restaurants are not using local ingredients, they are shutting down because no one is eating there. Every restaurant was cooking up amazing food incorporating local fare and flavors into traditional foods. The fried green tomato eggs Benedict with smoked cheddar grits, bacon braised collards with brown butter scallops, regional cheeses with rhubarb caramel and homemade crackers, and a lot of very delicious barbequed critter with all of the fix'ns were a few things I had the opportunity to taste. I visited an olive oil tasting room with infused olive oils and balsamic vinegars that ranged from regional to around the globe. I was so excited that not only were the restauranteurs performing heroic acts of local food-ism, but so were the citizens. They clearly supported the local food scene. There were farm to table eateries, forest to table products, and over 20 farmer's markets!
I should mention that Asheville is dubbed 'Beer City U.S.A.'. There is an enormous amount of brewing going on! Boasting more breweries per capita than any other U.S. city, Asheville is home to 12 craft breweries. On any given day, about 50 locals beers can be enjoyed, served on draft and in bottles. The most memorable brews and brew houses were the Lexington Avenue Brewery (the LAB), the Pisgah Brewing Company in Black mountain, and the Bywater which is nestled along the French Broad river. I loved the laid back atmosphere, kicking back in the warmth of the sun, with bluegrass bands picking in the background- what more could you ask for?
Back to eating. I really want everyone to eat grits. They are easy to make, and they can be adorned with many things, sweet or savory. It seems like a trend to pair grits with some variety of cheese. Being from Wisconsin I will not argue that. I will embrace it. I'm thinking about spring time cheeses like Manchego, fresh goat cheeses, or Cotswold- that creamy and tangy deliciousness form England laced with onions and chives. Along with spring cheeses, I would love to swirl some seasonal vegetables in my grits. Grilled asparagus or ramps, roasted artichokes, or pan seared peas. Wilted arugula or spinach would also be great. One final touch may be a few toasted pine nuts or almonds thrown on top with minced chillies and a drizzle of meyer lemon infused olive oil. Yeah, that's how I want my next bowl of grits to go. A drizzle of maple syrup and caramelized pears would do if you wanted something sweet. Enjoy yours however you can imagine them to be. Belly up!!
GRITS
2 cups whole milk
2 cups water
1 1/2 teaspoons sea salt
1 cup coarse ground cornmeal
1/2 teaspoon fresh ground black pepper
4 tablespoons butter
Place the milk, water, and salt into a large, heavy bottomed pot over medium-high heat and bring to a boil. Once the milk mixture comes to a boil, gradually add the cornmeal while constantly whisking. Once all of the cornmeal has been incorporated, decrease the heat to low and cover. Remove lid and whisk frequently, every 3 to 4 minutes, to prevent grits from sticking or forming lumps; make sure to get into the corners of the pot when whisking. Cook for 20 to 25 minutes or until mixture is creamy.
Remove from heat, add the pepper and the butter, and whisk to combine. Once the butter is melted, gradually whisk in the cheese (if using) a little at a time. Top with other add ins and dive in immediately!
Saturday, March 30, 2013
Hot Cross Biscuits
Last year at this time I was in Key West, hanging out in Margarita- Ville, sipping refreshing adult beverages with a herd of sun-kissed locals who were dressed as Easter bunnies in palm tree patterned belly shirts. It was remarkable. Every spring we try to flee northern Minnesota to warmer temps. We very temporarily migrate. We have not done this yet this year, and it is starting to show. I have lost my glow. But a trip is in the works, and there are warmer temperatures in our future. So I'm coming back with some spring in my step!
I have always wanted to literally roast the Easter bunny for Easter. I have only eaten rabbit a few times in my life, and those few experiences were great. I thought it would be wonderful to instill the flavors of rabbit in my family's memories to share with future generations. A family tradition of eating the Easter bunny. Maybe with a mustard sauce and fresh spring peas. Unfortunately rabbit is difficult to get your hands on in northern Minnesota. I was thinking that I still lived in Minneapolis and could just stop on by Clancey's meat market and grab a rabbit or two, a slab of pork belly, and maybe some fois gras to go with that batch of freshly made rhubarb jam. But I am no where near a Clancey's meat market, nor did I make rhubarb jam. So I was off to create a few new traditions.
Easter is more about eating chocolate bunnies and traveling in our household. Today we went to our community Easter egg hunt. We found colorful eggs hidden in the snow, we sipped church basement coffee, and we ate deviled eggs prepared by kind ladies. We had a feast this evening with friends, and the Easter bunny will probably make an appearance at our house later tonight. I also made hot-cross biscuits. Inspired by blogger-Joy the Baker, I couldn't resist wanting to adorn everything I baked this week with cream cheese frosting crosses. Biscuits make smiles happen in our kitchen. It was a match made in heaven. And as Joy the Baker says, 'Jesus would totally be down. I'm almost certain.'.
Hot Cross Biscuits
yields 8-12
3 cups flour
2 tablespoons granulated sugar
4 1/2 tsp baking powder
3/4 tsp salt
3/4 cup butter (1 1/2 sticks), cold, cut into small cubes
1 large egg
3/4 cup buttermilk
2 tsp orange zest
1/2 cup golden raisins, roughly chopped
For the frosting-
2 tablespoons cream cheese, softened
4 tablespoons butter, softened
1 cup powdered sugar
1/4 tsp cinnamon
1/4 tsp vanilla
Place racks in the center and upper third of the oven and preheat to 425 degrees F. Line two baking sheets with parchment paper. Set aside.
In a medium bowl, whisk together flour, sugar, baking powder, and salt. Add orange zest. Add cold butter and, using your fingers, work the butter into the flour mixture. Work quickly to incorporate the butter into the flour. The butter bits will be the size of small pebbles and oat flakes.
Whisk together egg and buttermilk.
Toss the golden raisins into the dry ingredient mixture, and create a small well in the center of the flour and butter mixture. Pour in the buttermilk and egg mixture, all at once, and use a fork to incorporate the ingredients. Make sure that all of the flour bits are moistened by the egg and buttermilk.
Dump the shaggy dough onto a lightly floured work surface. Bring together, kneading lightly, until the dough forms a 1-inch thick disk. Use a 2 1/2-inch round biscuit cutter to cut biscuit circles. Place on the baking sheet. Gently knead the remaining dough scraps together. Form into a 1-inch thick disk and cut out more round biscuits until no dough remains.
Brush biscuit tops with buttermilk and bake for 12 to 15 minutes, until lightly browned on top and firm-ish in the center.
Remove from the oven and let cool completely before frosting with a cross.
In a medium bowl, using a firm spatula, blend together 4 tablespoons unsalted butter, 2 tablespoons cream cheese, cinnamon and 1 cup of powdered sugar. Add the vanilla and a few drops of water if necessary to get the whole lot to blend evenly. Mixture will be thick.
Cut a small tip off of a zip lock bag (you can also use a small round cake decorating tip). Fold down the sides of the bag and scoop the frosting into the bag. Pipe crosses onto completely cooled biscuits and serve.
Biscuits are best served the day they are made, but will last, well wrapped at room temperature, for one day. Belly up!!
Subscribe to:
Posts (Atom)