There is a great cookbook out there by Kim Boyce called, 'Good to the Grain'. The book features alternative flours with recipes to go along, so you can test each of the different flours in something wonderful you've baked in your kitchen. There are cookies, waffles, scones, muffins and many more treats to test out in your kitchen. The book is a great reference guide to the flavor profiles of each of the individual flours, and what to pair those flours with. It's wonderful! I have been using the book often while experimenting with wheat free cooking. The cookbook is not gluten free baking, so if that is what you're looking for, this book is not that at all. The book explores the varieties of flours that are out there, sometimes the history and nutritional value of each, and flavor pairings. Again, it is wonderful!! There is a multigrain flour recipe included in 'Good to the Grain'. I love it! I have made alterations to the original and it is included below. The more flours I taste, the more I want to include them in the mix. It's a good problem to have.
As with the Cranberry relish recipe, I promised to share a wheat free biscuit recipe using Leaf lard. I'm really doing it! I made these biscuits with the Leaf lard rendered from our pastured pigs. It is GREAT! I also added in some bonus bacon bits and butter toasted pecans for good measure. I wouldn't steer you wrong! These biscuits will blow the minds of your Holiday guests this season. Go biscuit power!!
2 cups multigrain flour mix*
1/4 tsp baking soda
1 TBLS baking powder
1 tsp salt
3 TBLS unsalted butter, cubed
3 TBLS Leaf lard
1 cup buttermilk
1/4 cup chopped, cooked bacon
1/4 cup butter toasted pecans, chopped*
* Multigrain flour mix: 1 cup spelt flour, 1 cup oat flour, 1 cup barley flour, 1/2 cup rye flour, 1/2 cup almond flour. Combine all of the flours together in a large bowl, mix thoroughly, and substitute in your favorite baking recipes!
* To butter toast the pecans, simply add 1 TBLS salted butter to a skillet over medium heat. When the butter is melted, add the pecans and stir until the pecans smell toasty and nutty. Season to taste with salt and pepper. Cool and chop.
In a large bowl combine the dry ingredients. Work in the butter, until the cubes turn into pea sized bits. Now work in the lard. The lard sort of melts into the dough quickly, so it doesn't require much working in. Mix in the pecans and bacon. Make a well in the center of the dry ingredients and pour in the buttermilk. Stir together until just combined. Turn the dough out onto a floured surface, and pat into a 1 1/2 inch thick disk. Using a biscuit cutter, cut out biscuits, and place them on a parchment lined baking sheet. With the remaining scraps of dough, gently press them together and cut out a few more biscuits. Brush the tops with buttermilk and sprinkle with smoked sea salt if desired. Bake at 400 degrees for about 8-12 minutes, or until the bottoms are golden brown. For best results, serve warm! Belly up!!
Monday, December 9, 2013

Mom's Cranberry Relish
The Holiday season is in full force. It makes me want to hang Christmas lights everywhere, go sledding, and eat a lot of sugar in any form. I love it, and I have done all three of those activities a whole bunch!! Hurray for so much snow, you don't even know what to do- except go sledding! Right now though, I am contemplating if I may have overdosed on the 'consumption of sugar' part of the Holiday spirit I am rolling with. It happens to everyone, right? You start baking cookies like nobodies business (for your friends of coarse), and the next thing you know you've got nothing left to show for it but a platter full of crumbs. Every time! Geez!
There is one solution. My Mom's cranberry relish recipe. It's a cure all. It's a whole lot of raw fruits chopped together to make an amazingly healthy and delicious relish. We pretend that if you eat it after over consuming cookies, it will even it all out. Mentally. Maybe. I meant to post the recipe before Thanksgiving, but I was too busy living life. So here it is now. It is a great relish for Christmas dinner too!
Mom's Cranberry Relish
1 16 oz pkg fresh cranberries
2 cups fresh pineapple, peeled and chopped
2 medium sized, crisp- fleshed apples, roughly chopped (Honey crisp works great)
1 medium sized orange, zested, peeled and roughly chopped
1/2 cup sugar or 1/3 cup honey, optional
1/2 tsp orange oil, optional
Soak the cranberries in a large bowl or kitchen sink with a dash of vinegar for about 10 minutes, picking out any bad cranberries. Also wash the apples and orange.
Using a food processor chop, in batches, the cranberries, pineapple, apples, and orange. Place the chopped ingredients in a large bowl. Add the sugar or honey to your desired sweetness. Mix thoroughly. Add the orange zest and the orange extract if using. Refrigerate until use. The relish is best made a few days ahead of time and refrigerated to let all of the juices and flavors mingle and get happy together. You can fold this relish into quick bread or muffins, eat it atop a ham sandwich with mayo and arugula, or straight up to mentally balance all of the cookies you've consumed. Belly up!!
There is one solution. My Mom's cranberry relish recipe. It's a cure all. It's a whole lot of raw fruits chopped together to make an amazingly healthy and delicious relish. We pretend that if you eat it after over consuming cookies, it will even it all out. Mentally. Maybe. I meant to post the recipe before Thanksgiving, but I was too busy living life. So here it is now. It is a great relish for Christmas dinner too!
Mom's Cranberry Relish
1 16 oz pkg fresh cranberries
2 cups fresh pineapple, peeled and chopped
2 medium sized, crisp- fleshed apples, roughly chopped (Honey crisp works great)
1 medium sized orange, zested, peeled and roughly chopped
1/2 cup sugar or 1/3 cup honey, optional
1/2 tsp orange oil, optional
Soak the cranberries in a large bowl or kitchen sink with a dash of vinegar for about 10 minutes, picking out any bad cranberries. Also wash the apples and orange.
Using a food processor chop, in batches, the cranberries, pineapple, apples, and orange. Place the chopped ingredients in a large bowl. Add the sugar or honey to your desired sweetness. Mix thoroughly. Add the orange zest and the orange extract if using. Refrigerate until use. The relish is best made a few days ahead of time and refrigerated to let all of the juices and flavors mingle and get happy together. You can fold this relish into quick bread or muffins, eat it atop a ham sandwich with mayo and arugula, or straight up to mentally balance all of the cookies you've consumed. Belly up!!
Tuesday, November 26, 2013
Going Hog Wild
My husband and I slaughtered and butchered a whole hog this weekend. Little did I know, the work involved in the 'pasture to pork chop' process . I am humbled. There is skill in both slaughtering and butchering, and I now know that I only wish to master the art of butchering.

In the beginning, I always new that I wanted to raise my own food. A garden soon led to our egg laying hens, which led to some young feeder pigs from a friend's homestead. They were cute. There is no denying that we practiced extremely, extraordinary animal husbandry. When our pigs leaned in for a rump scratch, we obliged them. When the temperatures dropped, we made them a deluxe straw-bale bed. We fed them organic produce scraps from the Co-op and chased them around the pasture. It was over the top, but our pigs grew up into beautiful specimens. I have discovered that beautiful specimens taste delicious. It was worth doing 'pig' chores in the rain, the fog, and now the bitter cold. I feel tremendous joy that we did this. We did it! From pasture to pork chop, there were many lessons learned and many skills gained.
I was introduced to 'The anatomy of Thrift', a you tube series based on the art of butchery. You can watch the series on side butchery, which I shared on my last post. The videos were a life saver, and we need to hug all of the folks involved in putting together that very helpful tutorial on butchery. There are no butcher shops in Grand Marais. You are on your own when it comes to processing your animals, so inevitably we have become self- sustaining homesteaders. I just high- fived myself!
To carry on with homesteading traditions, I rendered my own lard; being careful to render the fat back separate from the treasured leaf lard. The leaf lard is the fat found along the inside of the loin and surrounds the organs. It is the highest grade of fat because it has the least amount of 'porky' flavor. It is ideal for pastries, so you pastry chef pals will be getting a jar! After rendering I was left with pork cracklings, which we overdosed on immediately. They are like pork croutons! So great on salads or to float in a bowl of creamy tomato soup. I'll share a wheat-free buttermilk biscuit recipe using a lard and butter blend in the future.

The bacon is being cured thanks to an article from 'The Splendid Table', which you can check out at splendidtable.org/recipes/curing-your-own-bacon. I was nervous about handling my own bacon, but this recipe talks you through it. After reading you will probably be tempted to go out and buy your own side of pork belly, and cure your own bacon. Rock on! In the recipe, the cure is easy and there are smoking variations using your patio grill and/ or your oven. Salt, sugar, and smoke. I got this! The hams will have a soak in a brine and then have a smoke and roast later. Hooray for salty, smokey pork!
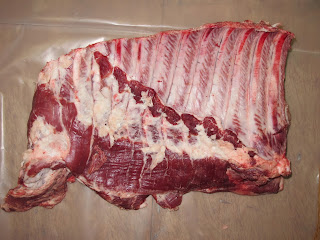

All in all, it was a successful weekend. Successful that we are harvesting healthy, home-grown food. Successful that we can be self- sustaining. And successful that we are teaching and preserving this old school way of living to future generations. My daughter was fascinated by the different cuts of pork laid out on our dinning room table. She wanted to know where each of the cuts came from. She was literally tickled when I showed her where pork belly is found. I think she will be a future bacon enthusiast. In the end we lived more and learned more. We are thankful to everyone! Thanks you family! Thank you friends! Thank you pigs!


In the beginning, I always new that I wanted to raise my own food. A garden soon led to our egg laying hens, which led to some young feeder pigs from a friend's homestead. They were cute. There is no denying that we practiced extremely, extraordinary animal husbandry. When our pigs leaned in for a rump scratch, we obliged them. When the temperatures dropped, we made them a deluxe straw-bale bed. We fed them organic produce scraps from the Co-op and chased them around the pasture. It was over the top, but our pigs grew up into beautiful specimens. I have discovered that beautiful specimens taste delicious. It was worth doing 'pig' chores in the rain, the fog, and now the bitter cold. I feel tremendous joy that we did this. We did it! From pasture to pork chop, there were many lessons learned and many skills gained.
I was introduced to 'The anatomy of Thrift', a you tube series based on the art of butchery. You can watch the series on side butchery, which I shared on my last post. The videos were a life saver, and we need to hug all of the folks involved in putting together that very helpful tutorial on butchery. There are no butcher shops in Grand Marais. You are on your own when it comes to processing your animals, so inevitably we have become self- sustaining homesteaders. I just high- fived myself!
To carry on with homesteading traditions, I rendered my own lard; being careful to render the fat back separate from the treasured leaf lard. The leaf lard is the fat found along the inside of the loin and surrounds the organs. It is the highest grade of fat because it has the least amount of 'porky' flavor. It is ideal for pastries, so you pastry chef pals will be getting a jar! After rendering I was left with pork cracklings, which we overdosed on immediately. They are like pork croutons! So great on salads or to float in a bowl of creamy tomato soup. I'll share a wheat-free buttermilk biscuit recipe using a lard and butter blend in the future.

the rendered lard with pre-broken down loins
The bacon is being cured thanks to an article from 'The Splendid Table', which you can check out at splendidtable.org/recipes/curing-your-own-bacon. I was nervous about handling my own bacon, but this recipe talks you through it. After reading you will probably be tempted to go out and buy your own side of pork belly, and cure your own bacon. Rock on! In the recipe, the cure is easy and there are smoking variations using your patio grill and/ or your oven. Salt, sugar, and smoke. I got this! The hams will have a soak in a brine and then have a smoke and roast later. Hooray for salty, smokey pork!

the pork belly before I removed the spare ribs

doesn't everyone stick recipes on the cupboard doors?
All in all, it was a successful weekend. Successful that we are harvesting healthy, home-grown food. Successful that we can be self- sustaining. And successful that we are teaching and preserving this old school way of living to future generations. My daughter was fascinated by the different cuts of pork laid out on our dinning room table. She wanted to know where each of the cuts came from. She was literally tickled when I showed her where pork belly is found. I think she will be a future bacon enthusiast. In the end we lived more and learned more. We are thankful to everyone! Thanks you family! Thank you friends! Thank you pigs!

Sunday, November 24, 2013
Sunday, November 10, 2013
Venison & Butternut Squash Chili
Outside it is drizzling, sometimes sleeting, and sometimes sunny- with a slight wind off of the lake. It's the typical deer hunting conditions of Northern Minnesota, which is happening right now. This weekend kicks off the start of the season, and as I went into Buck's hardware to pick up my kitchen knives, which were being sharpened, and a gallon of pink paint for my daughter's bedroom, there was a line up at the scale outside. Blaze orange and mud. Those are the colors that decorate the hunters weighing in their game of the day. I am not much of a hunter. I am keeping the fire going and making venison chili. I might also be online shopping for the perfect pair jeans, while I paint my daughter's bedroom pink- with my trusty Labrador under foot, anticipating a venison handout which is not going to happen. It's exhausting work, really.
I grew up hunting with my Dad, my Aunt Rene (Who can handle a gun like Annie Oakley, and shoots a buck on opener day almost every year), and Uncles. We would wake up early, before the sunrise, and guzzle hot chocolate and munch on snacks that my mom would pack for us, our eyes still closed. We would walk as quietly and gracefully as an uncoordinated youngster can, while wearing too many layers of clothes, boots that were a few sizes too big, and carrying a gun. We were obnoxious juveniles, but my Dad was always fairly patient. I don't really think he was worried about harvesting a deer, but wanted to give us the opportunity instead. When we became way too fidgety from the cold settling in down our necks and through our insulated coveralls, we would head back to the house. My Mom always had chili at the ready. Thank goodness Mom!! Seriously, I wasn't that into deer hunting, but it gave us a chance to be out in the wild, learning skills that I never thought would be beneficial to my future. We were on the prowl, like young savages. I'm sure it also gave my Mom a much needed break from her always louder than life kids. It was a good time had by all.
This afternoon, as I reminisce of the past and spend far too much time taking pictures of food, I feel bliss. I may not be able to compete with my Aunt, whom shoots a muzzle loader and I have witnessed skinning a squirrel in record time. I am not out hunting deer right now. But I did spend most of my time as a kid running around in the forests and pastures of Wisconsin, and I am gifting that experience to my daughter. I do spend a remarkable time outdoors, comfortable in that environment. Yeah, I sometimes find myself trying desperately to decide if skinny jeans are right for me.... but I feel bliss that I have balanced all of it out. The outdoors, the indoors, the skinny jeans, and the flavors of my chili. Slightly game-y venison paired with sweet and earthly butternut squash- grown in my sister-in-law's straw bale garden. Just the right amount of chilies, cumin, and cinnamon make it just how I want it. The porter helps add the dark and roast-y flavors, as well as the poblano peppers and the fire roasted tomatoes. Getting a really good sear on the venison really makes the magic happen. I hope you enjoy!!!
Venison & Butternut Squash Chili
3 pounds venison, trimmed and cubed
1 medium onion, small diced
1 heaping Tbls roasted garlic (about 5 cloves), chopped
1 medium poblano pepper, chopped
2 Tbl chili powder
2 tsp cumin
1/2 tsp cinnamon
1 bottle of porter (I used Summit Great Northern Porter)
1 can fire roasted diced tomatoes
1 can fire roasted crushed tomatoes
4 cups butternut squash, large dice
2 cans black beans, drained
salt and black pepper to taste
Sear the venison in batches in a large- heavy bottomed pot or a cast iron griddle, using olive oil of bacon fat. Set the venison aside. In the same pot add the onion and saute until translucent, about 5 minutes. Add the garlic and the poblano pepper and saute a few minutes more. Add the venison back to the pot with the chili powder, cumin, and the cinnamon. Saute everything, stirring often, to brown up the spices. Add the porter, scraping up the bits from the bottom of the pan, and reduce the heat to low. Add the tomatoes, taste and season well with salt and black pepper. Allow to simmer on low heat for about 30 minutes, or until the meat is almost tender. Add the butternut squash, and more beer if the chili seems a bit dry. Continue to simmer on low for about 20 more minutes until the squash and the venison are tender. If you add the squash too soon, it may break down into oblivion before the venison becomes tender. If that happens, it will still taste really great!! Adjust the seasonings to your liking. When the chili is complete, turn off the heat and add the beans. Don't worry, the residual heat will warm the beans. Ladle into bowls, and top with any or all of the following; sour cream, fresh cilantro, diced avocado, and my Mom's favorite- crushed Frito corn chips. Belly up!!
I grew up hunting with my Dad, my Aunt Rene (Who can handle a gun like Annie Oakley, and shoots a buck on opener day almost every year), and Uncles. We would wake up early, before the sunrise, and guzzle hot chocolate and munch on snacks that my mom would pack for us, our eyes still closed. We would walk as quietly and gracefully as an uncoordinated youngster can, while wearing too many layers of clothes, boots that were a few sizes too big, and carrying a gun. We were obnoxious juveniles, but my Dad was always fairly patient. I don't really think he was worried about harvesting a deer, but wanted to give us the opportunity instead. When we became way too fidgety from the cold settling in down our necks and through our insulated coveralls, we would head back to the house. My Mom always had chili at the ready. Thank goodness Mom!! Seriously, I wasn't that into deer hunting, but it gave us a chance to be out in the wild, learning skills that I never thought would be beneficial to my future. We were on the prowl, like young savages. I'm sure it also gave my Mom a much needed break from her always louder than life kids. It was a good time had by all.
This afternoon, as I reminisce of the past and spend far too much time taking pictures of food, I feel bliss. I may not be able to compete with my Aunt, whom shoots a muzzle loader and I have witnessed skinning a squirrel in record time. I am not out hunting deer right now. But I did spend most of my time as a kid running around in the forests and pastures of Wisconsin, and I am gifting that experience to my daughter. I do spend a remarkable time outdoors, comfortable in that environment. Yeah, I sometimes find myself trying desperately to decide if skinny jeans are right for me.... but I feel bliss that I have balanced all of it out. The outdoors, the indoors, the skinny jeans, and the flavors of my chili. Slightly game-y venison paired with sweet and earthly butternut squash- grown in my sister-in-law's straw bale garden. Just the right amount of chilies, cumin, and cinnamon make it just how I want it. The porter helps add the dark and roast-y flavors, as well as the poblano peppers and the fire roasted tomatoes. Getting a really good sear on the venison really makes the magic happen. I hope you enjoy!!!
 |
| These were the two essentials to adding dept of flavor to the venison chili! |
Venison & Butternut Squash Chili
3 pounds venison, trimmed and cubed
1 medium onion, small diced
1 heaping Tbls roasted garlic (about 5 cloves), chopped
1 medium poblano pepper, chopped
2 Tbl chili powder
2 tsp cumin
1/2 tsp cinnamon
1 bottle of porter (I used Summit Great Northern Porter)
1 can fire roasted diced tomatoes
1 can fire roasted crushed tomatoes
4 cups butternut squash, large dice
2 cans black beans, drained
salt and black pepper to taste
Sear the venison in batches in a large- heavy bottomed pot or a cast iron griddle, using olive oil of bacon fat. Set the venison aside. In the same pot add the onion and saute until translucent, about 5 minutes. Add the garlic and the poblano pepper and saute a few minutes more. Add the venison back to the pot with the chili powder, cumin, and the cinnamon. Saute everything, stirring often, to brown up the spices. Add the porter, scraping up the bits from the bottom of the pan, and reduce the heat to low. Add the tomatoes, taste and season well with salt and black pepper. Allow to simmer on low heat for about 30 minutes, or until the meat is almost tender. Add the butternut squash, and more beer if the chili seems a bit dry. Continue to simmer on low for about 20 more minutes until the squash and the venison are tender. If you add the squash too soon, it may break down into oblivion before the venison becomes tender. If that happens, it will still taste really great!! Adjust the seasonings to your liking. When the chili is complete, turn off the heat and add the beans. Don't worry, the residual heat will warm the beans. Ladle into bowls, and top with any or all of the following; sour cream, fresh cilantro, diced avocado, and my Mom's favorite- crushed Frito corn chips. Belly up!!
 |
| the cubed venison |
 |
| Getting a good sear is important. I am using this awesome stove top cast iron griddle that my Mom no longer had use for. It is awesome! It's like having my own flat top in my kitchen! |
 |
| The large diced butternut squash. Roasting the squash in a 400 degree oven until it is tender and toasty would be a fine way to handle the squash, instead of cooking it in the chili. Add it to the chili at the end of cooking, with the beans. Just another way to incorporate a roasted flavor element to your chili! |
Monday, October 28, 2013
Mary's Green Tomato & Pork Pozole
Meet John and Mary Ofjord. They are our kind neighbors. We like to honor the barter system with our neighbors. Our latest barter: Jeremy and I helped unload and stack over 200 bales of hay. In return, I get Mary's Green Tomato Pozole recipe. They are really good at bartering. I am terrible, but I do have this new recipe to put all of my green tomatoes to good use. Plus we get to spend time with our unique and gifted neighbors who have the most amazing Norwegian Fjord horses.
Aren't the beautiful? And they live right across the road! My daughter loves to watch the sun rise over their pasture while she battles it out with buttery toast at the breakfast table. It's a very unique view! And it's not that my daughter hates buttery toast, it's just that she strongly dislikes moving in any sort of progressive motion before the bus arrives at the end of our driveway each morning. The view helps the struggle.
 |
| The Fjord horses frolicking through the snow. |
\So about that recipe? I made it the very next day of the hay bale marathon. Pozole is an irresistible pork and hominy stew. It has the same comforting affect as a homey bowl of chicken noodle soup, but with spices to warm you. I love it for it's simplicity. I am wowed by it's flavors. The green tomatoes add a tartness and acidity that balances the richness of the pork. Garnish with fresh cilantro, scallions, and lime wedges for a super bowl of goodness to enjoy in front of the fire place!
Mary's Green Tomato & Pork Pozole
4 cups green tomatoes, diced
2 lbs boneless pork shoulder cut into 1 inch cubes
1 medium onion, chopped
Olive Oil for the pan
1 tsp dried oregano
1 tsp cumin ( I doubled the amount. Sorry Mary!)
3 cloves garlic, minced
2 fresh jalapenos, seeded and minced
2- 15 ounce cans white hominy, drained and rinsed
2- 14 ounce cans chicken stock, or the equivalent in homemade stock
juice of 1 lime, plus lime wedges for garnish
fresh cilantro, chopped for garnish
salt to taste
Garnishes:
Grated radish
Grated Pepper jack cheese
Sour Cream or Yogurt
Minced Onion or Scallions
Lime wedges
Cilantro
Mary says: With a lot of green tomatoes left over at the end of the season, I was trying to find new ways to use them up. Fried green tomatoes are not my thing and you can only use so much green tomato relish around the house. Since I've had a difficult time growing enough tomatillos (the traditional ingredient for Pozole) to make Pozole, a green pork stew which I dearly love, I tried making it with the green tomatoes instead. Some green tomatoes are not quite as acidic tasting as the tomatillos, so you will need to add lime juice to balance the tartness, but taste the stew first as some tomatoes are more tart than others.
To make Mary's Pozole:
Heat the olive oil in a Dutch oven or heavy bottomed pan. Brown the cubes of pork in batches. The better the pork is browned, the richer the taste of the finished stew. Set the browned meat aside.
Next add the onions and garlic to the pan and saute until the onions are translucent. Be sure not to scorch the garlic. Add the tomatoes, oregano, cumin, jalapenos, stock, and the browned meat. You can mash up the tomatoes, if necessary. Bring the stew to a boil, then cover and turn down the heat to a low simmer until the meat is tender- about 45 minutes to an hour. If your tomatoes are still in large pieces, take them out with a slotted spoon and process them in the food processor.
Once the meat is tender, add the two cans of hominy, the cilantro and the lime juice. You may want to taste the stew before adding the lime juice if your tomatoes were tart. Add salt (I added about a teaspoon), and heat to serve, topping with desired garnishes. Serves about 4-6 depending on who you have over for dinner!
Belly Up!!
Tuesday, October 15, 2013
Caramel Apples
I don't know if anyone has noticed, but we are up to our ears in apples at the Co-op. The Co-op currently has 16 different varieties of apples, 9 of them being regional. Woah Nelly, that's a lot of apples! I used to find this much variety a bit overwhelming. I now find it fascinating and progressive. Progressive because not only are new, delicious varieties of apples being created, but older, heritage varieties are being reintroduced, recognized, and preserved as well. It shows that we can create great apples, but also cherish those varieties that have been lost or under appreciated in the past. I get weak in the knees over a great apple. Everyone seems to have their own preference of what a good apple contains. For me, I like crisp and sweet. Unless I'm baking a pie, then I like crisp and tart. It's all about crisp apples for me. Although Cortland apples have a wonderful tart flavor that I love, but the apple is soft. What is a girl to do?!
So let's talk apple varieties for a second. Our regional apple selection at the Co-op is GREAT! We have Jonathon, Sommerfeld, Sweet 16, Cortland, Goodland, Chestnut Crab, Gala, Wolf River, and a Honeycrisp that is perfect. Flavor profiles you ask? Here's the low down; Sweet 16 is sweet and soft. The Cortland apples are tart and soft. The Chestnut Crab apples are tart and crisp. The Honeycrisp is sweet, but slightly tart with lots of juice and a crisp texture. (If you want to try a variety, but are a little nervous- go for the Honeycrisp!). The Wolf River apple is a very old variety that is large in size, commonly weighing over a pound. This apple is golden green to bright red in color with a firm cream- colored flesh that provides a rich, sweet flavor. The flesh is excellent for sauces, drying, baking, and just eating straight up. This apple has many characteristics of the apples that are on our farm, leading me to believe that I need to post some apple recipes ASAP! But first, a few more varieties and profiles that we feature at the Co-op......
Golden Delicious- crisp and sweet, with flavor notes such as pear, melon, and honey
Gala- crisp and sweet, this one seems to be a favorite eating apple for kids
Granny Smith- crisp and tart, great for pie and crisp operations
Braeburn- sweet, slightly tart with crisp flesh
Honeycrisp- sweet balanced perfectly with slightly tart, juicy, and crisp flesh. Make caramel apples!
Fuji- sweet and soft, with a mellow fruity flavor
Jonagold- sweet, crisp, and has been used as a vehicle for gorgonzola as my breakfast yesterday.
Whew! Apples! We love 'em, they are highly nutritious, and they are found in almost everyone's home this time of year. Here's what I've been doing with my apples. Eating an apple next to a hunk of gorgonzola cheese is ridiculously good. It makes the best breakfast. Unless you are commuting. Maybe don't try that combo while driving. I've been making a sauté of bacon, apples, and roasting garlic- finishing the sauté with a splash of fresh apple juice and white wine and serving over pork chops or chicken with a hearty green like kale or rainbow chard. I've been tucking apples in scone and muffins at work, and even making a creamy apple and butternut squash soup. My favorite treat to make with apples is the caramel apple. It's easy, fast, and can be eaten anywhere- around a campfire, at the bus stop, while riding a bicycle.......endless possibilities.
Caramel Apples
9 apples, I recommend a crisp and slightly tart variety (Honeycrisp!)
1 1/2 cups sugar
1/2 cup maple syrup
1/2 cup heavy cream
First, insert a skewer into the top of each apple. This will act as a handle for the ease of dipping the apples in caramel. It also makes for a handy handle for your caramel apple when it is ready for eating.
Combine the sugar and maple syrup in a medium heavy-bottomed saucepan, and stir. Cover, and cook over medium-high heat until sugar melts. Uncover, and continue to cook, swirling occasionally, until mixture is dark golden, about 10 minutes. Slowly drizzle in the heavy cream. Remove from heat, and stir until smooth. Transfer caramel to a small bowl. Let stand a few minutes to let caramel thicken and cool slightly.
Dip apples, one at a time, into caramel to coat the apples about three quarters of the way up the apple. Let excess drip off, and scrape bottom of apples against the side of the bowl to get some of the excess off.
*If you wanted to take your caramel apples to the next level, this is where you do so. Dip the caramel dipped apples into things like chopped dark and white chocolate, toasted nuts or pumpkin seeds, a sprinkle of smoked sea salt, and/or my daughter's favorite- sprinkles.
Place the apples on a parchment lined baking sheet, and allow them to set. Belly Up!!
So let's talk apple varieties for a second. Our regional apple selection at the Co-op is GREAT! We have Jonathon, Sommerfeld, Sweet 16, Cortland, Goodland, Chestnut Crab, Gala, Wolf River, and a Honeycrisp that is perfect. Flavor profiles you ask? Here's the low down; Sweet 16 is sweet and soft. The Cortland apples are tart and soft. The Chestnut Crab apples are tart and crisp. The Honeycrisp is sweet, but slightly tart with lots of juice and a crisp texture. (If you want to try a variety, but are a little nervous- go for the Honeycrisp!). The Wolf River apple is a very old variety that is large in size, commonly weighing over a pound. This apple is golden green to bright red in color with a firm cream- colored flesh that provides a rich, sweet flavor. The flesh is excellent for sauces, drying, baking, and just eating straight up. This apple has many characteristics of the apples that are on our farm, leading me to believe that I need to post some apple recipes ASAP! But first, a few more varieties and profiles that we feature at the Co-op......
Golden Delicious- crisp and sweet, with flavor notes such as pear, melon, and honey
Gala- crisp and sweet, this one seems to be a favorite eating apple for kids
Granny Smith- crisp and tart, great for pie and crisp operations
Braeburn- sweet, slightly tart with crisp flesh
Honeycrisp- sweet balanced perfectly with slightly tart, juicy, and crisp flesh. Make caramel apples!
Fuji- sweet and soft, with a mellow fruity flavor
Jonagold- sweet, crisp, and has been used as a vehicle for gorgonzola as my breakfast yesterday.
Whew! Apples! We love 'em, they are highly nutritious, and they are found in almost everyone's home this time of year. Here's what I've been doing with my apples. Eating an apple next to a hunk of gorgonzola cheese is ridiculously good. It makes the best breakfast. Unless you are commuting. Maybe don't try that combo while driving. I've been making a sauté of bacon, apples, and roasting garlic- finishing the sauté with a splash of fresh apple juice and white wine and serving over pork chops or chicken with a hearty green like kale or rainbow chard. I've been tucking apples in scone and muffins at work, and even making a creamy apple and butternut squash soup. My favorite treat to make with apples is the caramel apple. It's easy, fast, and can be eaten anywhere- around a campfire, at the bus stop, while riding a bicycle.......endless possibilities.
Caramel Apples
9 apples, I recommend a crisp and slightly tart variety (Honeycrisp!)
1 1/2 cups sugar
1/2 cup maple syrup
1/2 cup heavy cream
First, insert a skewer into the top of each apple. This will act as a handle for the ease of dipping the apples in caramel. It also makes for a handy handle for your caramel apple when it is ready for eating.
Combine the sugar and maple syrup in a medium heavy-bottomed saucepan, and stir. Cover, and cook over medium-high heat until sugar melts. Uncover, and continue to cook, swirling occasionally, until mixture is dark golden, about 10 minutes. Slowly drizzle in the heavy cream. Remove from heat, and stir until smooth. Transfer caramel to a small bowl. Let stand a few minutes to let caramel thicken and cool slightly.
Dip apples, one at a time, into caramel to coat the apples about three quarters of the way up the apple. Let excess drip off, and scrape bottom of apples against the side of the bowl to get some of the excess off.
*If you wanted to take your caramel apples to the next level, this is where you do so. Dip the caramel dipped apples into things like chopped dark and white chocolate, toasted nuts or pumpkin seeds, a sprinkle of smoked sea salt, and/or my daughter's favorite- sprinkles.
Place the apples on a parchment lined baking sheet, and allow them to set. Belly Up!!
Subscribe to:
Posts (Atom)